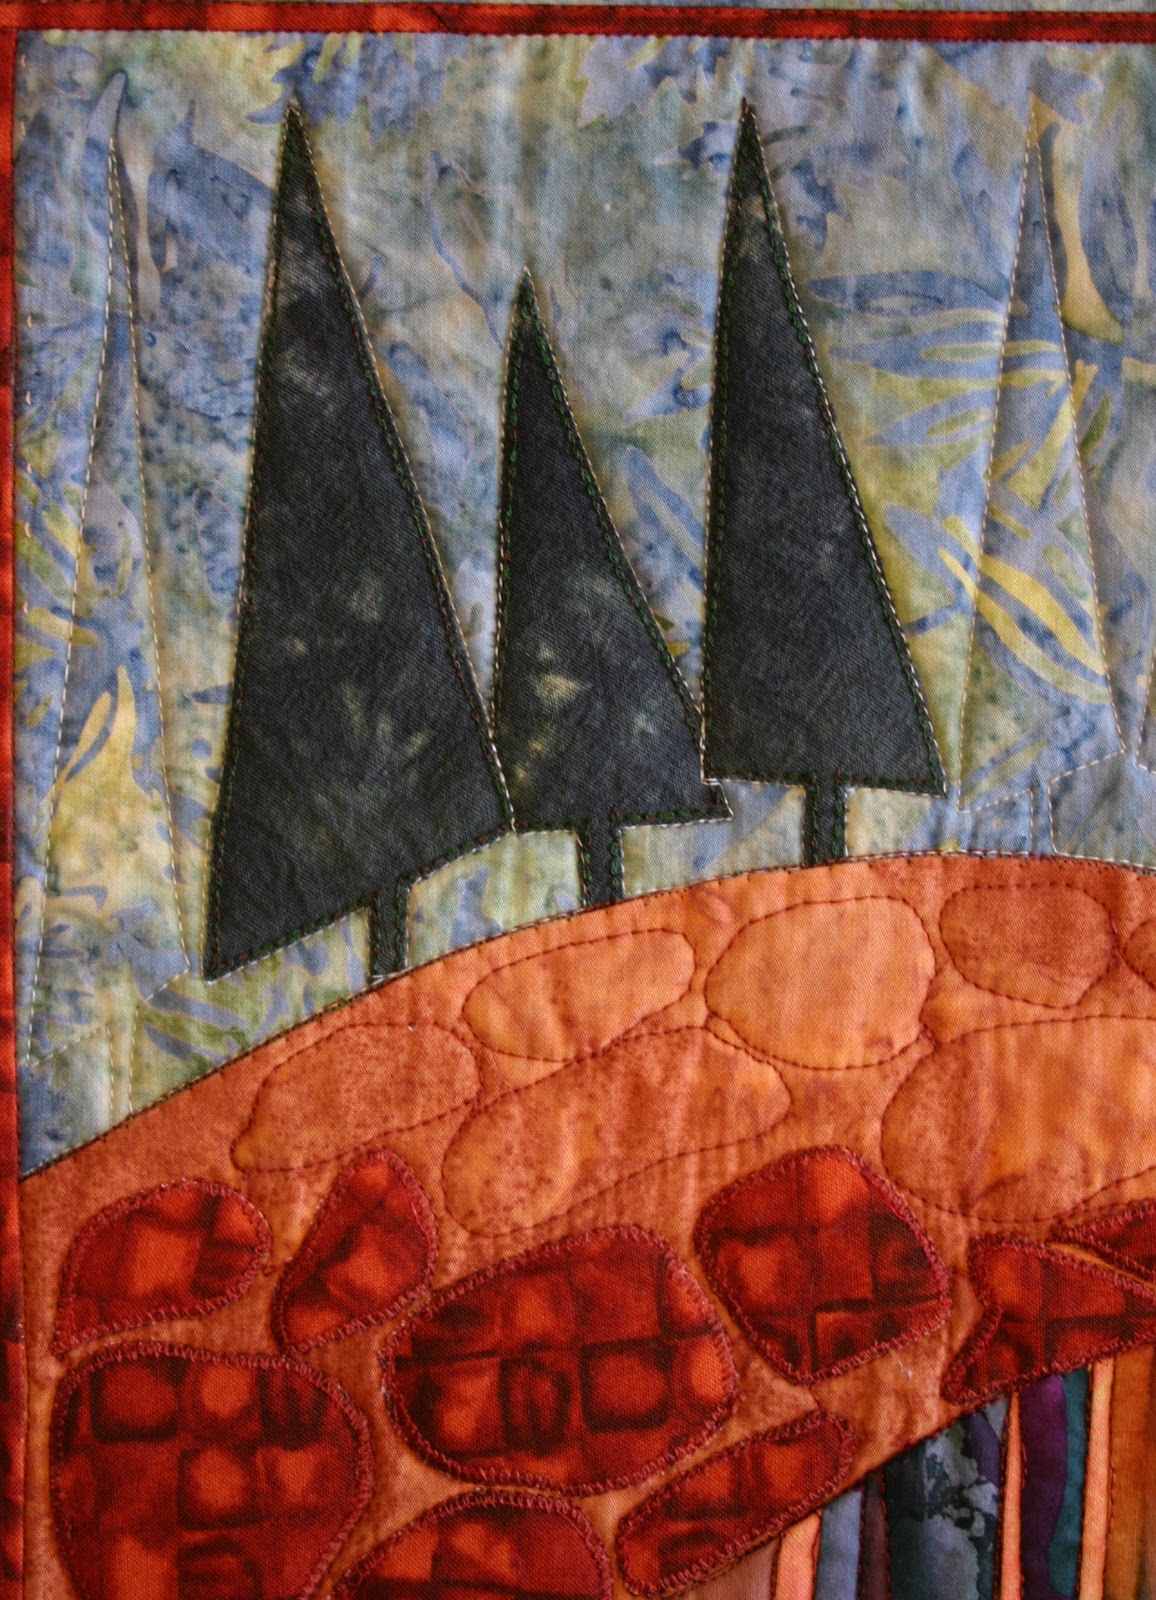
Saturday, February 26, 2011

Collage - Painting with Stitches

Quilt #17

Journal Quilt
Collage - Painting with Stitches - front

My reason for making this collage was to see if all these fabrics would play nice together in a sampler quilt.

The inspiration came from Quilting Arts Magazine – Issue 19 – Fall 2005 in an article by Carole Redlich, Painting with pattern stitches.

I cut irregular shapes of each fabric, and “glued” them to stabilizer using 505 Temporary Adhesive Spray, only repeating the blue fabric to help balance the composition. Place one piece in the centre and keep overlapping the others around it.

I threaded my machine with black thread to match my black fabric, (and used the same bobbin thread throughout), chose a decorative stitch and sewed close parallel rows of stitch beginning in an adjacent fabric, stitching across central fabric and into next abutting fabric. The stitching covers all the fabric piece as well as about 1 inch all around on the surrounding fabrics, keeping the rows close together.

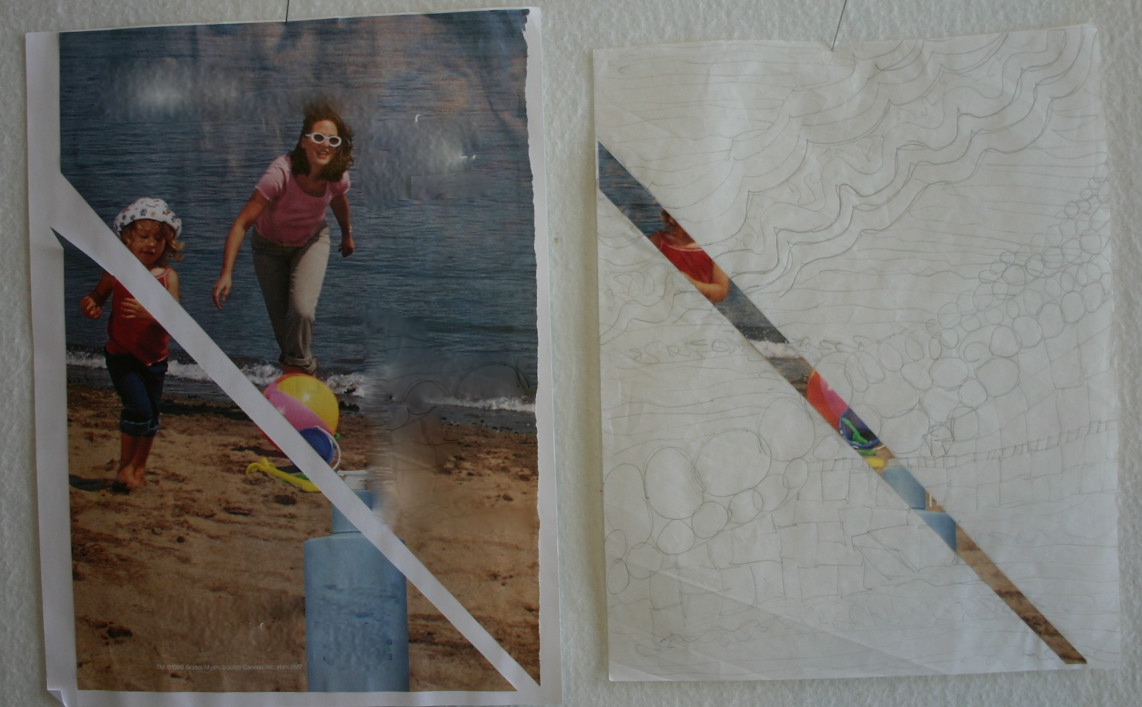
Collage - Painting with Stitches - back
Next, I  selected another piece of fabric, a thread to match it and another decorative stitch, change the angle of the stitching and repeat as above until all pieces were covered with stitches.

I then made a quilt sandwich and quilted with simple curvy lines using invisible thread on top and black on the back.

Conclusions:

I could have curved some of the rows instead of all straight lines.

Solid colour thread is more effective than the variegated I used on a couple of the patches.

I liked the finished quilt and decided that my colour selection would work for my sampler quilt.

I would really like to show you my finished sampler, unfortunately only the blocks got  finished and are still sitting in the UFO pile.

Have a great day.

Terry

Tuesday, February 22, 2011

From The Ground Up

Quilt #16


This week's quilt is the result of my second class with Australian teacher, Gloria Loughman held in Cookstown ON, in 2009.

She called this workshop “Layer by Layer – Abstract meets Landscape”, for students who want to take the next step and experiment with design and colour. The idea was to combine elements of landscape in an abstract way using techniques such as mosaics, foundation piecing, soft edge applique and invisible machine applique.

I chose to depict trees, boulders, grass, hills and water.

We could use one of her patterns, three were available, or design our own.

I designed my own, adding stylized evergreen to add a “Canadian” touch.

Each quilt consisted of 5 segments constructed individually and then stitched together using invisible machine appliqued.


trees and boulders

  1. The stylized trees were fused and raw edge appliqued using the reinforced straight stitch on my machine.


  2. For the boulders I used a technique called mosaic, made up of irregular shapes, which were also fused and zigzagged raw edge appliqued.


    boulders and grass


  3. I made a pattern and paper pieced the grass using 2 batiks and an orange hand dyed fabric.


  4. The hills were appliqued with an invisible machine stitch.


    hills and water


    5.  My last segment was water which was soft or raw edge applique and satin stitched with variegated thread.


    Two borders were added, a skinny border and a wider one which was turned to the back of the quilt and stitched down instead of a binding.

back - quilting, label

The quilting was mostly “in the ditch” except where I filled in with stitched boulders and trees in the empty spaces.


This quilt measures 15½” x 22¼”, fabric is batik and 100% cotton and dyed muslin,  has a hanging sleeve and label.

From the Ground Up was shown in the 2009 Kirkland Lake Mile of Gold Quilters Guild's Quilt Show.

Gloria Loughman's books are Luminous Landscapes and Quilted Symphony. 
It's a cold day in Kenogami, but the sun is shining and the sky is bright blue without a single cloud in sight.

Have a great day,

Terry


Saturday, February 19, 2011

Sand & Surf

Quilt #15

front

This a journal page was made on September 13, 2006. I'm glad I'm doing this documenting. I had forgotten about this technique and now I would like to try it again.

I found the idea in a book or magazine some time prior to making this and unfortunately can't give credit to whoever came up with this idea. I did what I remembered from the article.

The idea is to cut a sliver from a magazine page and use it as inspiration for the quilting design.  You can click on pictures for close-ups.

Cut sliver and stick on paper 


I experimented on paper first.  The little girl's neckline and elbow became wavy designs, balloon and pail - circles, bottle top - squares, etc.

design on paper 

I made the quilt sandwich using an over dyed fabric – this was large floral print that I did not like. And then the dye came out as a dirty pink. Still didn't like the fabric any better......I used the right side of the fabric for the front and the wrong  side of the fabric on the back of the quilt.

I added some organza ribbon, wrapping one piece of it around one corner, covered with a white shiny tulle.

front

I marked where a few of the designs started and ended and quilted using Sulky variegated rayon on top and a purple viscose on the back and a variety of stitches.

back
Conclusions:
The quilting was fun to do, once figured out on paper you just had to copy the design.
I really like the back much better than the front, the fabric also looks much better when quilted.
Don't like the looks of the tulle, maybe another tulle would have worked better, or not.

This was a fun experiment.  You should try it, let me know if you do.

Have a great day,

Terry

Tuesday, February 15, 2011

Boab Trees

Quilt #14

Boab Trees
This quilt was made during a workshop that I attended with Gloria Loughman sponsored by the Country Concessions Quilt Shop in Cookstown, ON,  a couple of years ago.

Gloria is from Australia, where the boab tree grows. She is a wonderful teacher and should you ever have the opportunity, take one of her classes.  She has written 2 books: Luminous Landscapes and Quilted Symphony. 

In this workshop, we learned to paint backgrounds for quilts using textile paint. The paint is applied and let dry. It then needs to be heat set to be permanent, this can be done using an iron and parchment paper.

painted sky


I painted the sky on white cotton and the ground piece just below the mountains was painted on a beige batik.


A full size pattern was made on stabilizer and freezer paper. After deciding on the construction order for the background area, the freezer paper was cut into each shape and applied to the right side of the fabric. Each piece was positioned on the stabilizer raw edge machine appliqued.

Fusible web was added to the tree fabric, the shapes cut and fused to the background.


quilting and skinny borders

Another technique taught by Gloria was how to make very skinny borders.  I added a black and a yellow and then the last wider border which I decided to flip to the back and stitched down as binding.  This quilt was free motion quilted.

back and label


Boab Trees measures 18½” x 17½” and was made in 2009.


Have a great day,


Terry


Saturday, February 12, 2011

Topsy Turvy

Quilt #13

Another Journal Page


My challenge with this piece was to paint fusible web and was inspired by Pam Watts' book, Beginner's Guide to Machine Embroidery.

I dropped blobs of fabric paint onto one half of a piece of Aleene's Original Iron on Fusible Web leaving the paper backing on.

I folded the unpainted section over the paint section, pressed and rubbed with fingers. Open up and let dry.

Cut out design and lay (paint side down) in position on background fabric. Iron to fix, cool and remove paper backing.

I tried to stitch through a sample but found it too sticky.
I decided to cover the design with organza sprayed with 505 temporary adhesive.

I quilted the layers together using a variegated cotton thread from Valdani and a zig zag stitch in a rectangular shape over the painted design.


Conclusions:

I experimented with a lot of other fusible webs and some can be stitched through with no problem and do not feel sticky.

Depending on the fusible web used and how the paint is applied, you can get very different results.


You have to remember that if painted fusible web is not covered by another fabric, it cannot be ironed without covering it with parchment paper, which can be purchased in grocery stores.  The backing on the back of fusible web is also parchment paper.

Have a great day,

Terry

Thursday, February 10, 2011

Folding a Quilt for Storage

Folding a Quilt for Storage

When to took out my Fast Pinwheels to photograph, I noticed some pretty heavy folded creases vertically and horizontally across the centre of the quilt.

If you store your quilts for any period time, they should be refolded differently every few months.

Although I obviously don't do it all the time, this is how I like to fold mine to prevent heavy creasing along the centre,  

First fold:  fold one corner across diagonally, going all the way to the adjacent edge if you wish. 


Second fold: bring the next corner in towards the centre, folding the previously folded section back onto itself. 


Third fold:  bring in another corner in to the centre as before.


Fourth fold:  Fold last corner in to make a square or rectangle.


You can now fold your quilt in half and store it at this point.
(You can see the creases from the previous folding here).


Or fold one more time, depending on the size you want.


You can refold your quilts many times this way by just changing the location of the folds. 

Have a great day!

Terry


Wednesday, February 9, 2011

Comments

Fingers crossed.


You can now leave a comment if you wish.............I think!!  


I adjusted some settings.


New blogger still learning the ropes.


Terry


Tuesday, February 8, 2011

Fast Pinwheel

Quilt #12

Fast Pinwheel

This week's quilt is my own original design and unfortunately there is no label on it.

It was probably made in 1998, and the reason I'm thinking this, is that I taught a week-end workshop of it in November 1998. But ....... I'm guessing it did not get quilted until 2008, because that's when I entered it in our guild's quilt show.

Oh, not bad.......only 10 years!

pinwheels

The pinwheels were made by sewing 2 brightly coloured strips on either side of a wider beige strip and then cut diagonally like this:


and sewn to a large brown triangle.

11" block

The narrow diagonal piece, cut off the pinwheels, were inserted between two striped borders.

mitered corner

The borders with mitered corners frame the quilt nicely.

back and binding

I really like the colours in this quilt, maybef a man's quilt!

Finally, a SUNNY day in Kenogami.

Have a great day.

Terry


Documentation:

Quilt Name: Fast Pinwheel
Description: 24 pinwheels surrounded with mitered cornered borders.
Pattern: 11” pinwheels, 4 x 6 set
Size: 55” x 76”
Fabrics: 100% cotton, including some hand dyed
Predominant colours: Beige, brown, yellow, orange, red, green, blue purple
Construction Techniques: fast piecing triangles, half square triangles, mitered corners
Back:100% cotton
Batting: Hobbs 80/20
Edge finish: 1/2” double french binding
Quilting: long arm machine
Quilted by: Marnie Mascioli of Calico Cat Quilting
Sleeve: No
Label: No
Date completed: 2008
Appraised: No
Quilt History: Shown in Kirkland Lake Mile of Gold Quilters' Guild – 2008 Quilt Show
Used for class sample.
Maker: Terry Whyte

Monday, February 7, 2011

NOFA Meeting - Feb 5, 2011

Northern Ontario Fibre Artists

Something a little different today!

I belong to the Northern Ontario Fibre Artists group, and we have been meeting for the last four years.

There are seven of us from 3 area communities and Saturday was our first meeting of 2011.

We meet regularly, 4 or 5 times a year, to share our work, information, books, techniques and challenge ourselves to learn, explore and grow our art.

The morning starts with a Show and Share session, everyone's favourite. This includes anything and everything from completed works, work in progress, experiments, interesting articles from books and magazines, new products, call for entry to must-surf websites.

So today I thought I would show you what we have been up to.


These are projects that were brought in this time around.


And some of the individual pieces.......

Marie


Marnie

Silvia


Jane


Terry


Hope you enjoyed the show.

Have a great day,

Terry

Sunday, February 6, 2011

Bougainvillea

Quilt #11
front


My Journal Page today is called Bougainvillea after the beautiful shrubs that grow everywhere in the Phoenix area.

My challenge was to use natural material as part of a quilt.

I picked these bougainvillea petals on the ground in my daughter's yard in Scottsdale AZ in July 2006.
(see picture of petals below)

I found out that they are actually bracts that surround a very tiny flower. They feel papery to the touch and stayed soft after being in a plastic baggie for a long time.

back
I also picked some petals that were brighter colours but not completely dry and tried drying them myself but no success there. Better to let Mother Nature do her thing.

I lightly sprayed the quilt top with 505 Temporary Fabric Adhesive and arranged the petals on the fabric and pressed in place.

I chose a fine coppery orange tulle, cut some into 1½” and 2” squares and layered them over the really bright green areas of the hand painted background to soften the colour (see back for original colour). I then covered the whole thing with a piece of tulle.

I used a thick polyester batting so the leaves would puff up and quilted around the shapes. A Sulky variegated rayon thread, stitched in a very small tight stipple, flattened the background and puffed the petals beautifully. The outside edges were zigzaged

I found this very easy to work with. 

 The “bracts” haven't broken down in the quilt and I like the way the tulle keeps everything where it is supposed to be.

I also think that using the layered squares of tulle over the background was effective in softening the bright green.  

Have a great day.

Terry

Thursday, February 3, 2011

Myah

front

Quilt #10


Last time, I posted Myah's Baby Quilt so you could see the connection with this Journal Quilt.


My challenge was to used the same fabrics in a totally different way.


I cut narrow strips at the frayed edges.


After layering the back, batting and top, and starting at the bottom end of the quilt sandwich, I stitched through all layers.


I used metallic thread in the bobbin to add a little interest to the back of the quilt.

Some of the strips go straight across, some on an angle to cover part of the previous strips.


A decorative stitch was added on the last (top) strip.


Zigzaged all edges but lifted bottom strip and zigzaged on the underneath layer.


I like the colour combination and I think there is enough contrast to make the quilt interesting.


The inspiration for this was “Striae 2” by Deborah Lacativa in Fabric Art Gallery (Leisure Arts Publication)

Date made: August 8, 2006


Tuesday, February 1, 2011

Myah's Baby Quilt

Quilt #9

This quilt was made for my nephew's daughter, my great-niece Myah.

The baby's room had a fish theme, so I fussy-cut some fishes from a dark fabric and added 2 borders alternating between strippy fabric and either green or blue fabrics.


A skinny dark pink border framed the blocks.

I then cut rectangles from all the green or blue fabrics for the outside border.

The strippy fabric was used for the binding.

A little guess work here - I do not have the exact measurements of this quilt, but I think it twould be about 36” x 48” and it was made in 2006.

This is where is it so good to have labels – I now try to remember to include the size of the quilt as well as the quilt name, my name, where I live, the date completed. Any other interesting information can also be added.

I'm sure I made a label for this quilt but unfortunately did not take a picture of it.


When you take pictures of your quilt, take pictures of the front, back, a detail or two, and a close-up of the label.