Tuesday, February 28, 2012

Big Blue Logs – February 2012 UFO Challenge

Quilt # 77


One more UFO completed!
Big Blue Logs
This was my #1 in the UFO Challenge 2012 for February. A challenge issued by Judy Laquidara at Patchwork Times. Click the orange 2012 UFO Challenge button at right for more info.

This was my challenge:


1 – Blue Log Cabin

This has been around a long, long time and I just want to get it done. It is king size and it will be long arm quilted. I have to prepare a back, have it quilted, label and bind it. Measures 106” x 106”.
1/4 of a log cabin
I'm so happy it's done and out of the closet where it has been since probably the mid-nineties.


It is made up of 36 – 14” blocks, each “log” is finished at 2”. The navy blue that looks like lattice is actually the last 2 strips on the dark side of the block.

not lattice
There are 3 borders, 1”, 3½” and 5½”.

The long arm quilting was done by Marnie Mascioli from Calico Cat.

quilting
And here's a photo showing the label, binding and quilting.

back of quilt
Thanks for looking,

Terry

DOCUMENTATION
Quilt Name: Big Blue Logs
Description: King Size Log cabin
Pattern: Log Cabin
Size: 104” x 104”
Fabrics: 100% cotton plus 1 fabric (solid pink) polyester
Predominant colours: Blues, pink
Construction Techniques: strip-pieced log cabin
Back: 100% cotton
Batting: Hobbs 80/20
Edge finish: Double fold french binding
Quilting: Long arm machine quilted
Quilted by: Marnie Mascioli from Calico Cat Quilting
Sleeve: no
Label: yes
Date completed: Feb, 2012
Quilt History:
Maker: Terry Whyte

Thursday, February 23, 2012

MASSIMO


Quilt # 76

Massimo

This was the latest President's Challenge by our outgoing  President, Charlene Stevens.


I had tried painting on fabric a few times, so decided to attempt a picture of my littlest grandson, Massimo. I just loved the way his hair flipped up when he was little, so this photo was my inspiration.

Photo Inspiration

I changed the photo to a sketch in Photoshop Elements and traced it onto the muslin.


Photoshop Sketch

My next step was to do all the stitching except for the background quilting. This was done through all three layers of the quilt.  (Sorry about the colour, bad lightning!)

Drawing partly stitched
Stitching done
At this point I steamed it to get all the wrinkles out.

Blocked
When the piece was dry, I quilted the background and then stretched and pinned the quilt sandwich onto my painting surface (2” styrofoam covered with plastic tablecloth).

Jacquard Textile Color was my choice for painting. Here's a couple of pictures of my work in progress.

Painting in Progress
WIP close-up
WIP close up

The inner brown border, representing a mat, was coloured with a watercolour pencil.
Background quilting and "mat".

I used a fine permanent marker for eyes' details.

details


For binding, I brought the back fabric to the front and stitched it down by hand. I then added a row of stitching right along the edge of the binding.

Massimo - back
Added a sleeve and a label.

label
I will be taking a Painted Quilt Art class with Patt Blair at the Empty Spools Seminars in April and am really looking forward to that. Patt paints first and then stitches. Can't hardly wait!!

Terry

DOCUMENTATION

Quilt Name: Massimo
Description: Painted on muslin
Pattern: Original
Size: 19¼” x 18”
Fabrics: muslin
Predominant colours: brown
Construction Techniques: painted with textile paint
Back: own hand-dyed Egyptian cotton
Batting: cotton batting
Edge finish: Back turned to front
Quilting: free motion – variegated thread in background
Quilted by: Terry Whyte
Sleeve: yes
Label: yes
Date completed: 2011
Inspiration: photograph
Quilt History:
Maker: Terry Whyte

Thursday, February 16, 2012

Plumed Rio Grande & February's Free Motion Challenge with Diane Gaudynski


Quilt #75


Plumed Rio Grande
I have often tried quilting feathers but not with very satisfactory results. This tutorial by Diane Gaudynski was excellent.


See other quilter's results by clicking The Free Motion Challenge button on the sidebar.

Here are my results of February's Free Motion Challenge.

This was my first practice piece.
Sample #1- front
Not too bad for a first effort but the main feather was way too big, this piece measures 17” x 21”, the plumes were hard to control and the thread doesn't blend in.  I l think the thread on the back blends better with the fabric.

Sample #1 - back
After re-reading the tutorial, I decided to try again with a smaller piece this time (14” x 14”) and work with a smaller design.  Much happier with the results.

First I drew it on paper to get the feel of the curves.  Not pretty but it helped a lot
.
Sample #2 - drawing
With  Diane's design right beside me at the machine, I tried to follow it as close as possible. 
I also tighten my background stitiching.


This is my Sample #2.

Sample #2 - front

Sample #2 - back


Quilt # 75

Plumed Rio Grande


After much practising, I was ready to tackle a “real” quilt.  This table topper and prepared back have been sitting in my UFO pile for a few years.  I'm hoping to finished a UFO a month using the Free Motion Challenge each month.  So far, so good.

Plumed Rio Grande 
Plumed Rio Grande - back

This is what I learned and things I could have done differently:
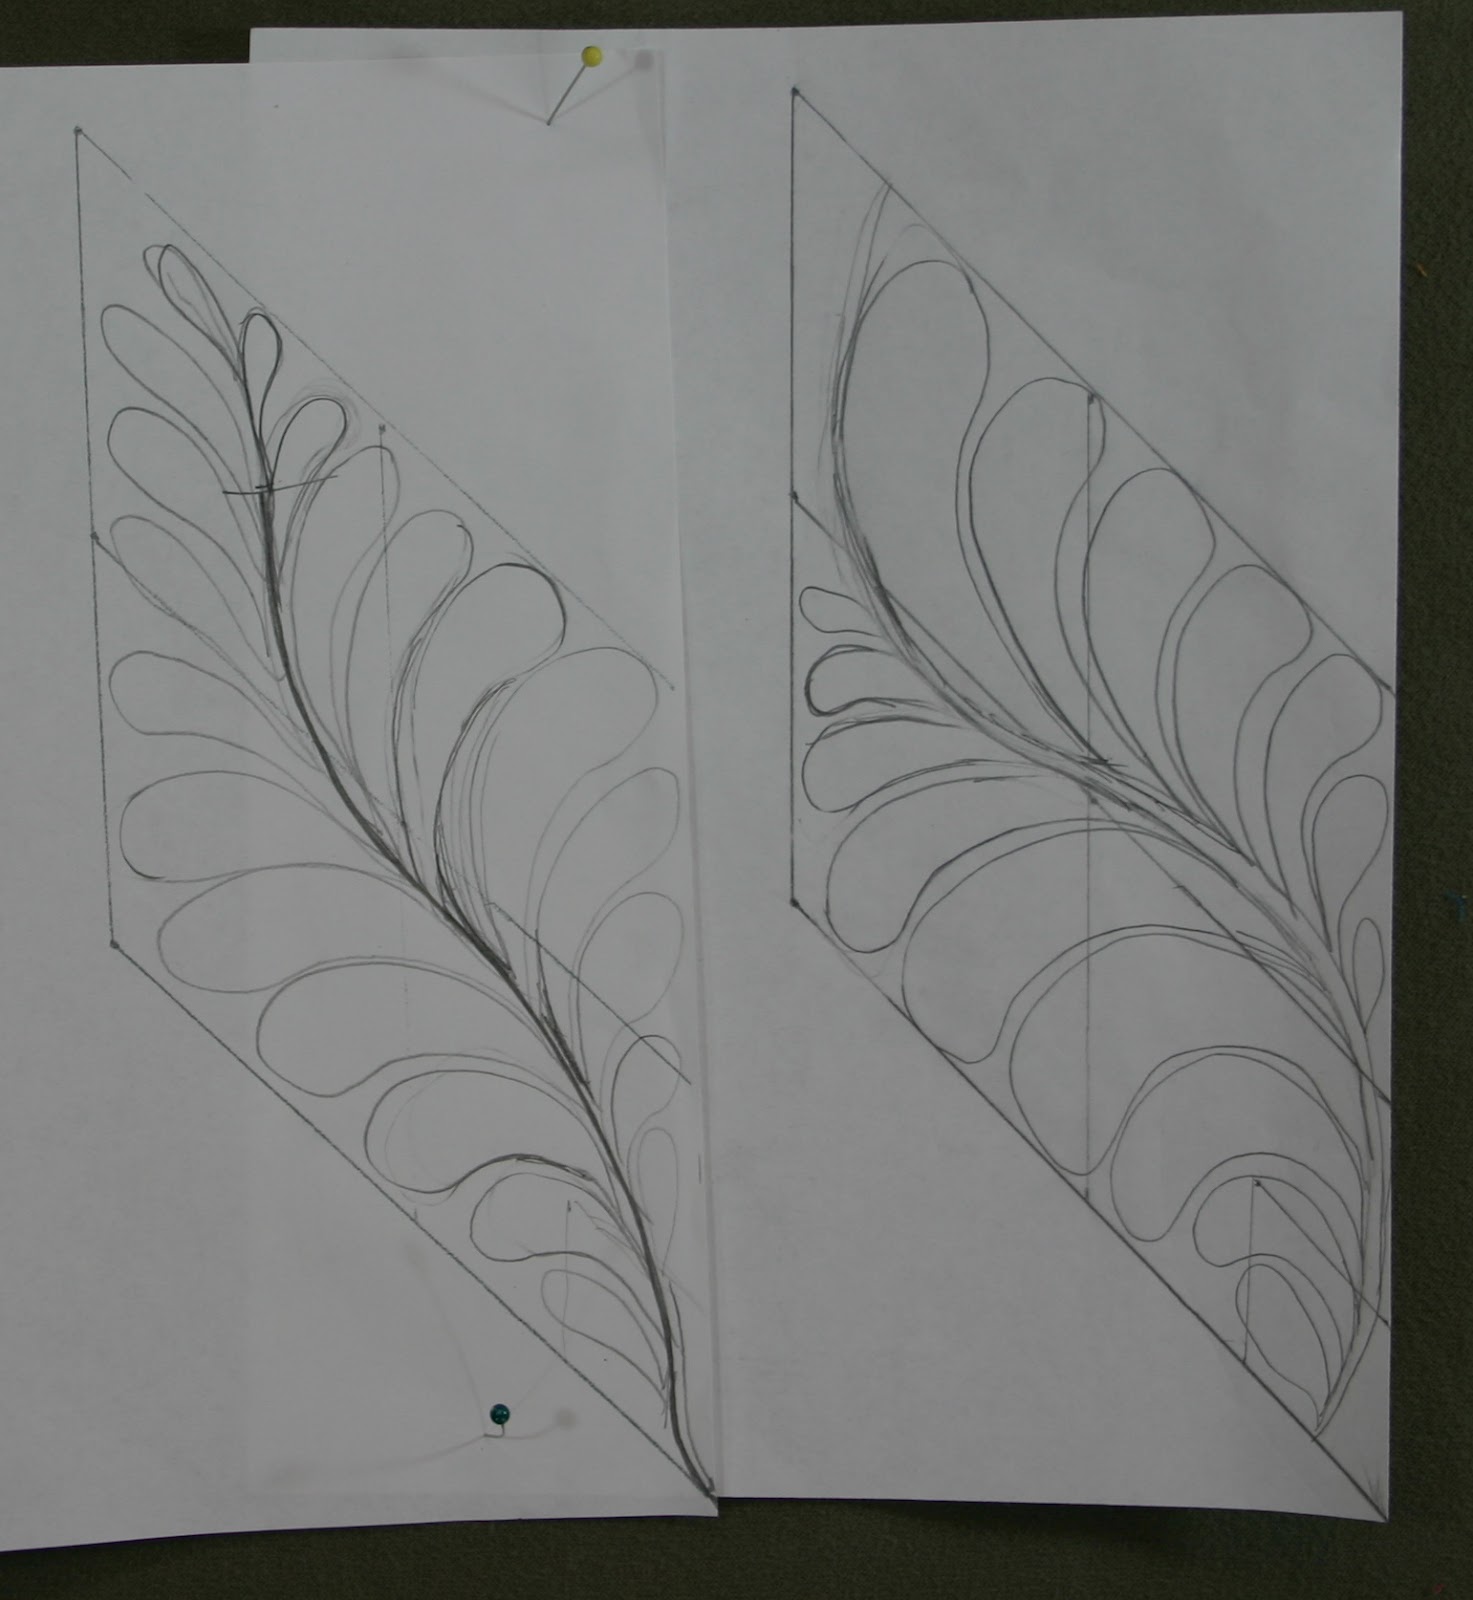
I like the feathers in the star. I drew a couple of different curves for the spine and chose the one I liked best and practised stitching it out.
Drawing of different curves
Practice sample
One the outside border, I decided to swirl into the squares and triangles around the star, and was happy that I could make the plumes fit the spaces.


It's a lot of feathers.  In hindsight, a better option might have been to fill in the squares and triangles with a background stitch, maybe some Diane shiko.


I think the colour of thread on the star works.

Star  - front
Star - back

I don't like the thread colour on the outside border, should have been lighter, so it would show up on the dark blue.  


The picture below show the feather design going into the triangles and corner squares on the back of the quilt.  Too bad it does show on the front as well.
Feather design going into side triangle and corner squares


I now have a pretty good idea of how to cover an area or a specific space.

Love using wool batting. 

I found that you need to remember to leave space for echoing.

Also not go too close to the outside edge or the binding will cover it up.  I made as small a binding as I could but some of it still got covered up.  You can see that in the picture below.

I couldn't find a spot on the quilt to sign it and did not want to add a label so I put my name on the back binding

Name and Date


There is a lot of room for improvement, but I am happy with the results.
Another UFO finished! The block Rio Grande is from Judy Martin”s The Block Book and I used it to teach precise piecing. 

Many thanks to Diane Gaudynski for this tutorial.

Terry


DOCUMENTATION 

Quilt Name:  Plumed Rio Grande
Description: Table topper 
Pattern: Rio Grande from Judy Martin's The Block Book
Size:  28 1/2" x 28 1/2"
Fabrics: 100% cotton
Predominant colours: Navy, gold, white, red
Construction Techniques: piecing
Back: 100 % cotton
Batting: Wool - Hobb's Heirloom Premium
Edge finish: Single fold  binding
Quilting: Free motion feather quilting
Quilted by: Terry Whyte
Sleeve: No
Label: Signed and dated
Date completed: Feb 2012
Maker: Terry Whyte


Tuesday, February 7, 2012

Star Light, Star Bright


Quilt #74

Star Light, Star Bright


Another guild challenge! And it was a real challenge as 35 members participated, so we had to use all of the 35 different fabrics. (rules below)
I decided on this interlocking pinwheels or stars design, I wish I could remember the name of the pattern.
Each colour had to go into 4 blocks, in the right order, to form the stars.

blocks


I used one of my 3 additional fabrics to make up the even number of stars.
The quilting is a simple grid through the squares and free motioned stars in the black centres and in the background.


back of quilt


pocket and hanger
I added a pocket at the back to insert a wooden hanger (cut from a piece of panelling), and made a bias-cut binding to go around the circle. 

These were the rules as issued to members. It was still in my files.

KIRKLAND LAKE MILE OF GOLD QUILTER'S GUILD
SEPTEMBER, 1998 - CHALLENGE

1. Each member to submit a 1 metre piece of washed and ironed good quality 100% cotton fabric. Please submit fabric would be happy to receive not something you just want to get rid of. Bring to October meeting.
2. Fabric will be cut in even pieces (size will depend on number submitted).
3. At the November meeting, participants will receive one piece of each fabric submitted.
4. Participants will make a wall quilt using any amount of all fabric squares in amounts large enough to be recognizable.
5. Up to 3 additional fabrics can be used. Any fabric(s) can be used on the back.
6. Use any construction method and any design.
7. Maximum perimeter of quilt to be no larger than 180" and can be any shape.
8. Deadline is April meeting. Will be judged by Viewer's Choice.


DOCUMENTATION

Quilt Name: Star Light, Star Bright
Description: Interlocking stars (or pinwheels)
Pattern:
Size: 31½” across
Fabrics: 100% cottons
Predominant colours: all colours
Construction Techniques: piecing
Back: 100% cotton
Batting: polyester
Edge finish: Double bias binding
Quilting: Machine quilted in a grid with free motion stars into the centre squares.
Quilted by: Terry Whyte
Sleeve: Yes
Label: No
Date completed: 1999
Quilt History: This quilt was displayed in the Kirkland Lake Mile of Gold Quilter's Guild Annual Quilt Show in May 1999.
Maker: Terry Whyte


Friday, February 3, 2012

Peaky & Spike


Quilt # 73


Peaky & Spike

This was the first challenge for our guild. I issued the Dots R Us Challenge by giving all members a piece of very bright large polka dots on a black background. Not sure why I had so much of it but was glad to give it away and out of my stash. Must have been on sale.

I made Peaky & Spike, an underwater scene using Dorren Speckman's fish pattern which was very popular in 1997.

detail 


This is one of my early “Art Quilt”. I stippled the fish with metallic thread and couched some wool strands for weeds.

Also used some of my hand painted fabrics in the quilt and a multi-coloured stripe on black with colours similar to the polka dots for the binding.


back of quilt

No label but I did sign the back with a Sharpie marker, adding the name of the quilt and year made.

DOCUMENTATION

Quilt Name: Peaky & Spike
Description: Underwater scene
Pattern: Original design using Doreen Speckman's fish pattern
Size: 24” x 17½”
Fabrics: 100% cotton, some hand painted
Predominant colours: blue and bright polka dots on black
Construction Techniques: piecing
Back: 100% cotton
Batting: polyester
Edge finish: Double fold french binding
Quilting: Machine quilted
Quilted by: Terry Whyte
Sleeve: yes
Label: signed
Date completed: 1997
Quilt History: This quilt was displayed in the Kirkland Lake Mile of Gold Quilter's Guild Annual Quilt Show in May 1997
Maker: Terry Whyte