Showing posts with label Journal Quilts. Show all posts

Friday, October 7, 2011

Off-centre log cabin


Quilt # 46

Off-centre log cabin

This is the last quilt from my first binder of Journal Quilts, which I will be glad to put away, as it (the binder) has been hanging around the computer for a long time.

I'm hoping to take more photos of quilts soon, especially of my King size quilts, and I will have to do this outside on the clothesline. My inside board is not large enough.

The trouble is that the sun has been shining fairly steadily for a few weeks now and I'm waiting for an overcast day. What a problem to have!! The weather has been gorgeous and I'm enjoyed every minute of it doing lots of outdoors chores.

Have a great day,

Terry


Off-centre log cabin

Challenge: I wanted to try using the log cabin method starting with an uneven hexagon centre.

Technique: I cut strips randomly (3/4” to 1”) wide and stitched and flipped around the hexagon. I tried to avoid placing 2 similar values next to each other.

Quilting: I quilted in the ditch around and around from the centre using invisible thread on the top and red thread on the back. I then added a swirl of leaves using a decorative stitch and lime green thread.

Edges: A couple of rows of zigzag in lime green thread.

back

Back: Left-over pieced squares from another project.

Conclusions: I would like to try this method to represent a sun or other round or oval object in a pieced quilt. I really can't imagine making a bed size quilt from this technique but Mrs. Dyer did.


Mrs. Dyer's quilt c. 1940 
Inspiration: From Quilter's Newsletter Jan/Feb 2007, a quilt made my Mrs. Dyer of Perth, c.1940.

Date Made: March 24, 2007

Maker: Terry Whyte


Wednesday, September 14, 2011

Feathers and Swirls


Quilt #45

Challenge: Quilting feathers.

Techniques: I chose an Helen Squire pattern that was published in the American Quilter. The name of the pattern is Joyce.

Quilt Page 1 - front
Quilt Page 1 - I drew the outline of the pattern onto my quilt sandwich and quilted using Sulky Rayon 30 wt variegated thread on the top and a Signature cotton/polyester in the bobbin. The background was a combination of straight line and stippling.

Quilt Page 2 - front

Quilt Page 2 – On this quilt I decided to use the same thread (Sulky Rayon 40 wt) in top and bobbin and eliminate the straight lines

Conclusions:
Quilt Page 1 - back
Quilt #1 - It was almost impossible to stop the bobbin thread from showing on top. Adjusting the tension just transfered the problem to the back.

The variegated thread on the front was not a good choice for this kind of design, where there was  a lot of backtracking.

Quilt Page 2 - back
Quilt #2 –Much happier with the same thread on the top and the bottom and prefer the plain stippling background,without straight lines.

I especially like the looks of the rayon thread on the hand dyed fabric on the back, except where there is a built-up of thread.

Thread choice is important to the look you want to achieve.


Date Made:  March 17, 2007


Maker:  Terry Whyte

Have a great day,

Terry

Thursday, September 8, 2011

Circles


Quilt # 44

Circles 
This was Experiment #2 with painted fusible web.

A lot of “What Ifs”.
In a previous journal page, Topsy Turvy, I used fabric paint on a paper-backed fusible.
So, what if I use craft acrylic paint instead of fabric paint.
What if, I paint directly on fusible web that isn't paper backed.
What if, I use tulle instead of organza.
What if, I remove some of the tulle after quilting.
There's always more what ifs.

Challenge: To see how craft acrylic paint would react on a no-back fusible web.

Techniques: The acrylic paint was watered down and lightly painted onto “Jiffy Fuse Fabric Joiner”. 
Dried in sun about one hour.
Cut out circles and arranged on background.
Also cut up bits into confetti and dropped randomly on quilt.
Covered with parchment paper & ironed lightly, if ironed too long the web will be shiny.
Wait for fabric to cool to remove parchment paper or fusible web might lift off.
The 2 darker gold circles have 2 layers of web.

Quilting: Made quilt sandwich and covered front with beige tulle and stitched around circles and stippled the background.
Removed the tulle from circles using seam ripper.

Edges: Zigzagged stitch

Back: Left-over rail fence blocks  

back


Conclusions:  I learned a lot about handling painted fusible web as an embellishment and have made several small landscape quilts and taught classes about this technique.
The confetti doesn't show well here because of busy background, but I think could be used effectively.
The only draw back is that the quilt cannot be ironed ever (without parchment paper)  and would probably not be washable. A technique for Wall or Art Quilts only.

Date Made – February 24, 2007

Maker – Terry Whyte

Have a great day,

Terry

Friday, September 2, 2011

3-D Star


Quilt #43

Back


Challenge: The challenge for this quilt was to see if I could create a 3-d effect using satin stitch.

Techniques: I drew the design on paper, cut out to use as templates. After cutting the shapes, I fuse them to my background.

I satin stitched with off-white thread and narrow (2.0) stitch on “light side” and a wider (2.5) stitch and black thread for the “dark” side

Quilting: Assembled quilt sandwich and quilted with invisible nylon thread on outside of white lines and on the inside of the black lines to see if that would give more a 3-D effect.

I mixed a white and a green thread for the background swirls and black and green for the dark.

Edges: Finished edges with stitch # 27 on my Husqvarna.

3-D Star
Back: Pieced squares left-over from another project. 

Conclusions: I find that the centre area looks somewhat 3-D but not so sure the points do. Perhaps wider dark satin-stitch????

Date Made – February 17, 2007

Maker – Terry Whyte

Have a great day,

Terry

Tuesday, August 30, 2011

Morning Glory

It's been a very busy summer but now that we're back from holidays and things are somewhat back to normal, I'm hoping to get a bit more blogging done.

Since I already have photos of more Journal Pages, I want to document the half dozen still from this binder. Zippered binders and plastic sheet protectors are great for keeping the “page quilts” as well as all the information together for easy reference.


Quilt # 42

Morning Glory


Challenge – To use ordinary Crayola crayons on Fusible Web

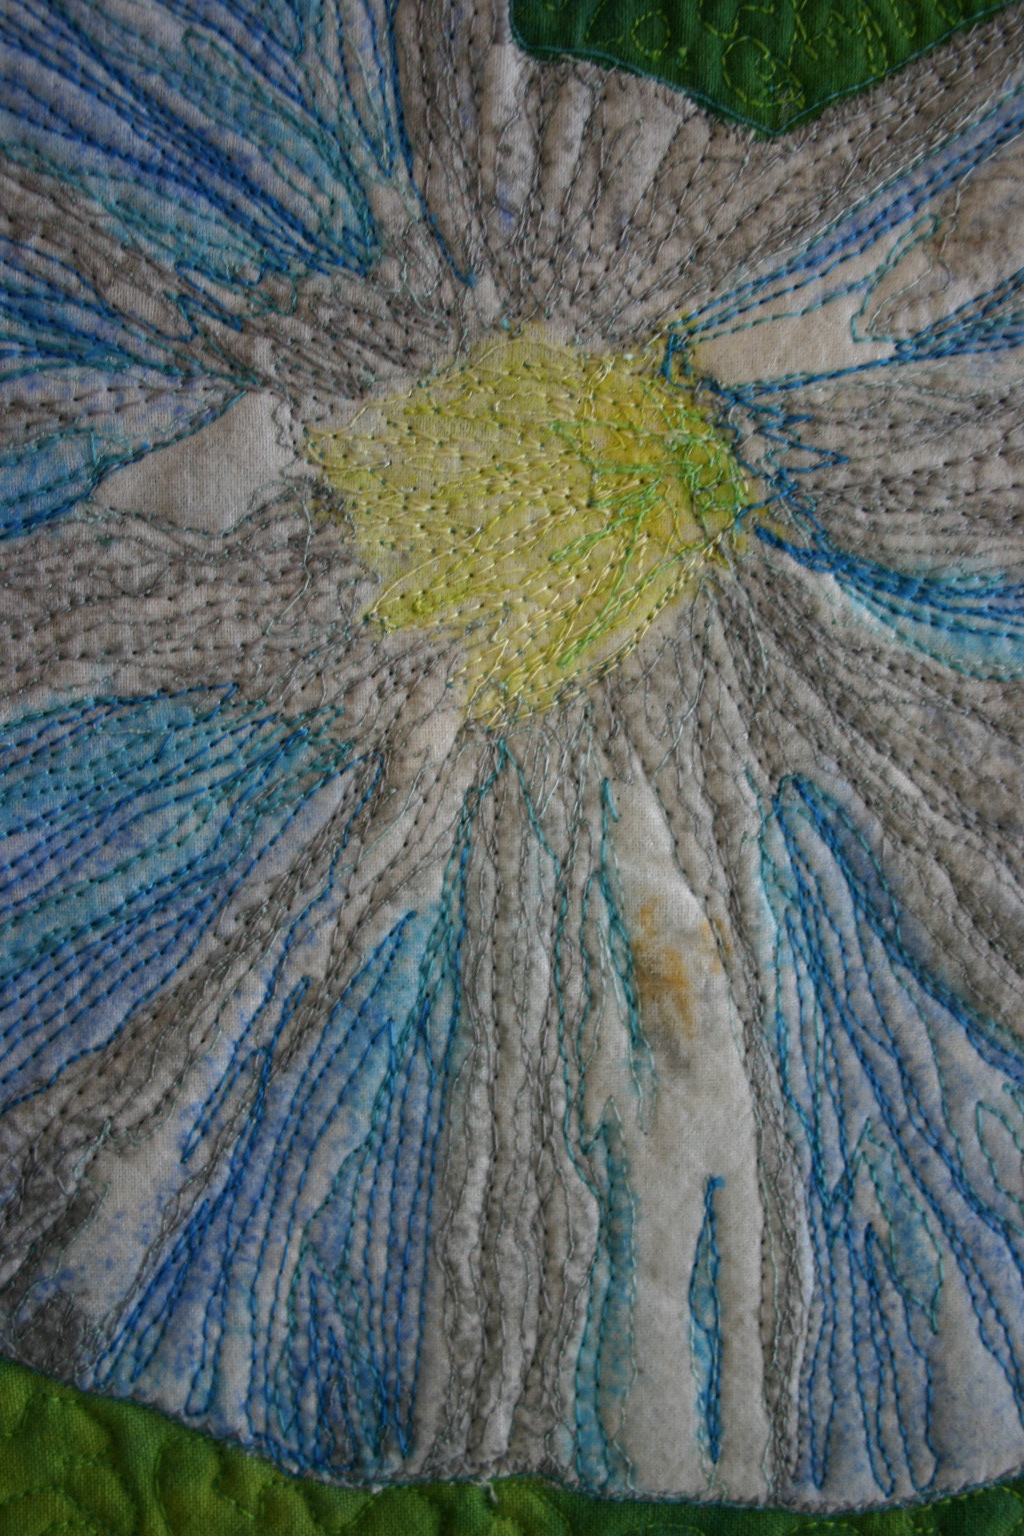
Techniques - I took a close-up of one of my morning glories and used a photo program to change it to this, then enlarged it page size.


Taped fusible web to the paper and coloured with the crayons and cut the flower outline. I traced the outline on freezer paper, added white fabric and layered the coloured fusible web on top. Placed the three layers between parchment paper and pressed lightly to make web stick to fabric.

The flower was cut out and applied to a hand painted background and the edges were free-motioned zigzagged. The centre and grey areas were thread painted before making the quilt sandwich to give some dimension to those areas.

detail


Quilting – Made the quilt sandwich and quilted blues and lightly over centre and grey areas. Stippled background.


back

Edges – Blanket stitched.

Back  - Hand painted “Background” fabric.

Date Made – February 10, 2007

Inspiration - original

Conclusions – I like the subtle look of the colour under the thead painting.

Maker – Terry Whyte

Thursday, May 19, 2011

Bacon & Eggs

Quilts # 31 – 32 - 33


These were fun to make little quilts!

Monochromatic  -  Complimentary  -  Analogous

Challenge – I wanted to make 3 quilt pages using the same simple design in in three different colour schemes, changing up some of the embellishments and stitching and/or quilting for interest.

Monochromatic Colour Scheme
Quilt # 31

Bacon and Eggs 1 - Monochromatic (One hue, including its tints and shades)

Techniques - Using Green
Cut and sprayed the “plate” with 505 Temporary Adhesive, used a small zigzag stitch over a straight stitch around the edge.
Embroidered a machine design to decorate the plate. Folded “bacon” fabric back and forth and zigzagged in to obtain crinkled fried bacon look.
Monochromatic - back
Cut “egg whites” and burned the edges and stitched just inside the burned area with invisible thread. Bright green egg yolks completed the top.

Quilting – Invisible thread outlined the plate and food, stitched a line about an inch inside the edge of the plate for dimension.
Quilted background in off centre grid using 2 different greens.

Edges – Couched wool around edge for binding.

Back  - “Background” fabric.

Date Made – January 20, 2007


Complimentary Colour Scheme
Quilt #32

Bacon and Eggs 2 – Complimentary (any pair of hues which are opposite one another on the colour wheel)

Techniques - Using Orange and Blue
Edge of “plate” was left raw edged and stitched with a straight stitch and a decorative design was added.
The bacon was made as in #1.
Used orange tulle for the “fried edges and overlayed organza over the egg white printed fabric.
The blue egg yolk were zigzagged in place.
Complimentary- back

Quilting – Outline quilted the design and stitched on both sides of embroidered decorative plate design. The background was quilted with a curvy stitch from my machine, all quilting done with invisible thread.

Edges – Zigzagged edges with a peach thread.

Back - “Egg white” fabric.

Date Made – January 27, 2007


Analogous Colour Scheme


Quilt #33

Bacon and Eggs 3 - Analogous 
(Hues that are adjacent or next to each 
other on the colour wheel)

Techniques - Using Violet, Purple, Blue, Blue green and Yellow green, varying the values for contrast.
Zigzagged edges of plate and added a stitched decorative stitch.
The “bacon” fabric already had a crinkly look so just zigzagged the edges on it and the egg yolk and egg white using a purple thread. The egg white fabric is a light yellow green hand dyed and the yolk has a blue green checked printed fabric.
Analogous - back

Quilting – All the quilting was done using a variegated rayon thread. The design was outline quilted, free motion loopy loops lines on the background, stippling in the centre of the plate and wavy lines on the bacon.

Edges – Finished with a decorative stitch.

Back - “Plate” fabric. 

Date Made – February 3, 2007


Conclusions – These were fun to make and choosing fabric following a “plan” eases the process of understanding how colour schemes work.

Maker – Terry Whyte

Have a great day!

Terry

Tuesday, May 10, 2011

Leaves

Leaves

Quilt #29


Challenge: 

Another journal page experimenting with bleach to discharge.

Techniques:  I used a Q-Tip dipped in bleach/water mix to draw a branch directly on fabric.

The leaves were stamped at the tips using a leaf stamp dipped in bleach, blotting the edges of the stamp before stamping to avoid edge marks. 

Rinsed and dried the fabric.

Added ribbon and zigzagged the branch.

Make the quilt sandwich and free motion quilted around the branch and leaves, stitching in more branches and leaves to the background.


sample


At this point, I decided that the leaves were not discharged enough, I really liked the looks of my sample, so added more bleach to the leaves and also slightly discharged the quilted background design using the Q-Tip. 

Rinsed the whole quilt and dried.


back of quilt


Ribbon was added to the edges of the quilt and zigzagged in place.


Conclusion: 

Discharge can be done at any stage, before or after quilting although there was a slight bit of discharge that seeped through to the back.

The trick is to leave the bleach on just the right length of time.  It's a guessing game!


Have a great day!

Terry

Friday, May 6, 2011

Buttons and Things- Discharge

Quilt #28
Buttons and Things

A New Year's resolution - 2007.


At the beginning of January, 2007, I decided that I would try to make one journal quilt a week to experiment with different techniques on a small scale.  I had made a few journal pages (see previous posts) and really enjoyed the process but hadn't made any since September, 2006.
 
I had fallen on some ice and broke my wrist on December 2nd, 2006, my arm was still in a cast, but I needed to do something “quilty”. It could not be too complicated as cutting was a challenge, but I could use the sewing machine.


Samples

For this quilt page, I opted to experiment with discharging (removing colour from the fabric). I chose bleach (Javex) and a dishwashing gel (Cascade) as a discharge medium.


I chose some blacks as well as couple of coloured fabrics and found that some discharged better than others and some do not discharge at all. 

 Also, although most fabric discharged to a brown and/or beige, a few provided surprises discharging to other colours.


detail

I added a bit of water to the bleach so it wouldn't eat through the fabric, but used the dishwashing gel as is.

I found that the bleach gave nice crisp straight edges and more even colour while the dishwashing gel, being thicker had softer, more mottled and uneven edges.

I made a couple of square stamps from a sweet potato, and using the bleach, stamped a grid on a black and dark blue print that had discharged nicely. When I thought there was enough dye removed, I rinsed in clear water and dried.

I added some embellishments to the squares, clothes labels, small bright scraps of fabric and yarn. A rummage through my Mom's button tin produced some old worn metal buttons and odds and ends like a little buckle, a snap and a zipper tab and a dismantled earning part.


Back - this is the original fabric that was discharged on the front


A simple grid of metallic copper thread between the squares and a buttonhole stitch for the binding completed the quilt.


NOTE: I have discharged more fabric since and have used vinegar or a product like Bleach Out to neutralize the bleach.


Made on January 6, 2007.


I think spring has finally arrived in Kenogami, we still have ice on the lake and patches of snow here and there.  I'm really ready for summer, it has been a long winter.

Off to work in the garden,

Have a nice day,

Terry

Tuesday, April 26, 2011

Dyeing to Play 2 – Pembina River

Quilt # 26

Dyeing to Play 2 - Pembina River

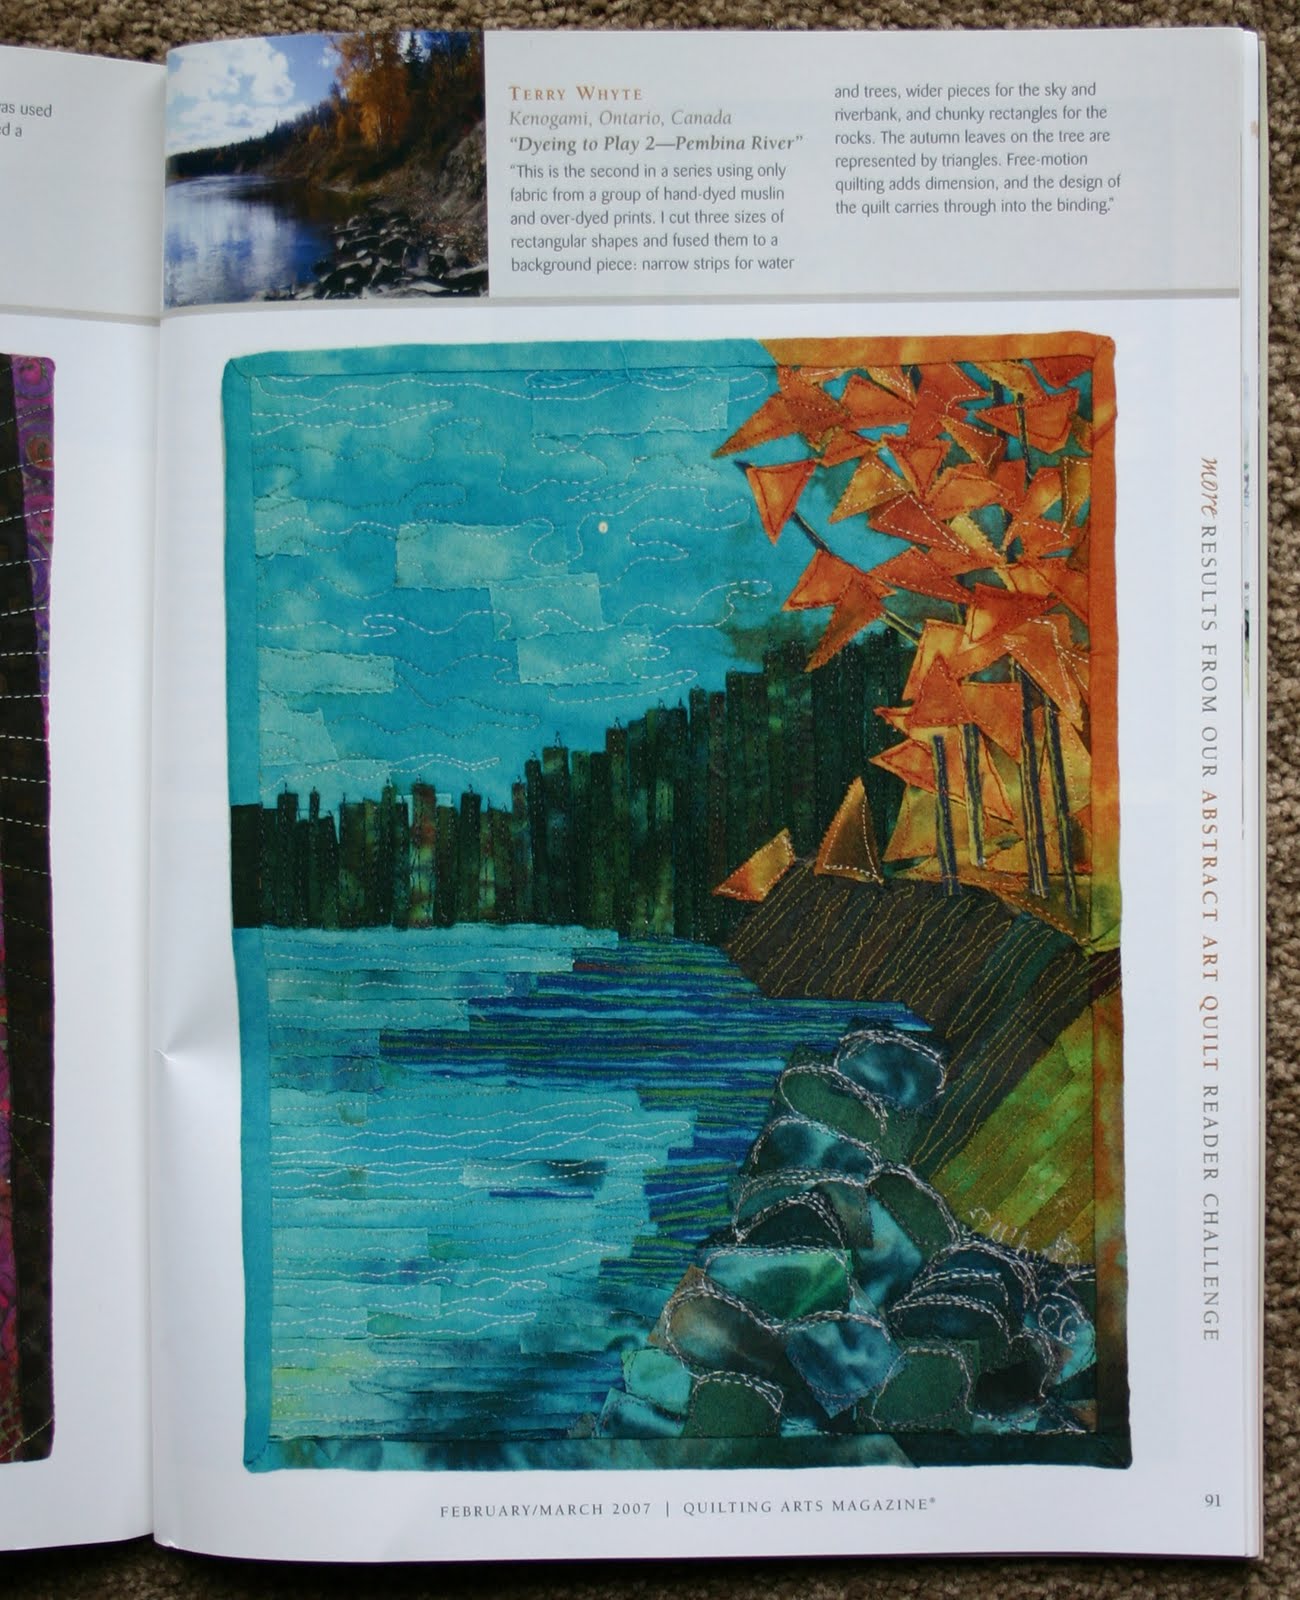
This quilt was made in response to Abstract Art Quilt Reader Challenge by Quilting Arts Magazine.

The challenge was to create an 8 ½” x 11” abstract quilt from a representational photograph based on principles and elements set forth by Liz Berg in her two-part article on abstract design in Quilting Arts Magazine

It was inspired by this photo that my son took while fishing on the Pembina River in Alberta, Canada.
inspiration

Dyeing to Play 2 – Pembina River was made in July, 2006 and a picture of it was published in the February/March 2007 issue of Quilting Arts Magazine.
Quilting Arts Magazine


This is the second in a series using only fabric from a group of hand-dyed muslin and over-dyed prints.  See this post.

I cut six fabrics into 4 pieces and dyed each group of six, golden yellow, burgundy, turquoise, and brown.   A few fabrics from the turquoise and yellow groups were used in this quilt.

Three sizes of rectangular shapes were cut and fused to a background piece, narrow strips for water and trees, wider pieces for the sky and riverbank and chunky rectangles formed the rocks.
The leaves on the autumn tree are represented by triangles.

Free motion quilting adds dimension and the design of the quilt carries through into the binding.
back

Since this quilt was page size, I fused the back to a piece of freezer paper and printed the label right on the quilt back. The fabric was first treated with Bubble Jet Set which makes the printing permanent.

label 
Have a great day,

Terry

Saturday, February 26, 2011

Collage - Painting with Stitches

Quilt #17

Journal Quilt
Collage - Painting with Stitches - front

My reason for making this collage was to see if all these fabrics would play nice together in a sampler quilt.

The inspiration came from Quilting Arts Magazine – Issue 19 – Fall 2005 in an article by Carole Redlich, Painting with pattern stitches.

I cut irregular shapes of each fabric, and “glued” them to stabilizer using 505 Temporary Adhesive Spray, only repeating the blue fabric to help balance the composition. Place one piece in the centre and keep overlapping the others around it.

I threaded my machine with black thread to match my black fabric, (and used the same bobbin thread throughout), chose a decorative stitch and sewed close parallel rows of stitch beginning in an adjacent fabric, stitching across central fabric and into next abutting fabric. The stitching covers all the fabric piece as well as about 1 inch all around on the surrounding fabrics, keeping the rows close together.

Collage - Painting with Stitches - back
Next, I  selected another piece of fabric, a thread to match it and another decorative stitch, change the angle of the stitching and repeat as above until all pieces were covered with stitches.

I then made a quilt sandwich and quilted with simple curvy lines using invisible thread on top and black on the back.

Conclusions:

I could have curved some of the rows instead of all straight lines.

Solid colour thread is more effective than the variegated I used on a couple of the patches.

I liked the finished quilt and decided that my colour selection would work for my sampler quilt.

I would really like to show you my finished sampler, unfortunately only the blocks got  finished and are still sitting in the UFO pile.

Have a great day.

Terry