ART
PROMPT - #15 – Use Lutradur
 |
| Lutradur Poppy and Poinsettia |
The
Englehart Area Artists hold a yearly Christmas Tyme Sale to coincide
with The Unveiling of Christmas. Area artists and crafters bring in
their goods and the sale articles are placed “boutique style”
throughout the hall.
Club
members are also asked to participate by making one or two 12” x
12” canvases to sell at this event.
This
year's theme was red, green and a touch of gold.
The
Lutradur prompt came along at just the right time for this project.
I
started by drawing on the Lutradur and adding layers of
acrylic paint starting with a layer of white and adding 1 or 2 layers
of colour.
 |
| drawing on lutradur |
 |
| white layer of acrylic paint |
 |
| second layer |
 |
| third layer |
For
my background, I cut three different beige silk fabrics into random width strips to stitch together. I added a couple of skinny strips of
shiny gold fabric (not lame, but similar) and a strip of light green
piping to each panel.
 |
| stitched panel |
 |
| detail |
I added a layer of thin wool batting and quilted in the ditch.
I
then placed 3 lenghts of green sheer ribbon on seams and used a
decorative machine stitch over the seam and ribbon.
After cutting out and appliqueing the lutradur flowers and leaves, I changed my mind and
decided I liked the looks of the ones I had outlined in black best, so I
went back and did them all the same.
 |
| leaves before black outline stitch |
 |
| black stitching in progress |
I
also thought I needed to add some dark values so the paint came back
out. The nice part of using lutradur is that acrylic paint barely
seep through it, so it can still be painted after it is attached to
the fabric.
 |
| darker values added |
 |
| Lutradur Poinsettia |
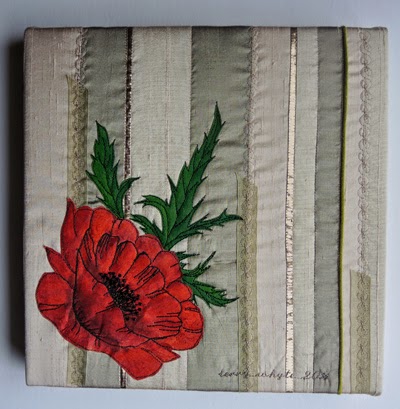 |
| Lutradur Poppy |
See
you next time,
Terry
NEXT
ART PROMPT - #16 – cover up
something
HERE'S
MY “ART PROMPT” PLAN
One
prompt, one project (taking as long as required to finish the
project)
It's
OK to finish or use a previously started project (UFO) as a starting
point.
Make
something creative.
Use
any Media.
Blog
about the project.
Pick
another prompt once the project is done.


