Thursday, December 29, 2011

Jewel Tone Medallion IV

I hope everyone are enjoying the holiday season and that you all had a very Merry Christmas.
I had a great Christmas and now it's time to relax and get down to some serious quilting. I've spent the last few days getting to know my new Bernina, which is just awesome.


Quilt  #67
Jewel Tone Medallion IV

Lets get back to the quilt documentation. Today we have another medallion, the last in the series, that is completed. Number 2 still needs to be quilted. See Country Stars Medallion and Elephant Walk.

All 4 quilts in this series, uses the same pattern, except for the central 12” block, border #7 made up of 6” blocks and of course different colour schemes.

detail - Jinny Beyer border print
The colours for this quilt were chosen using Jinny Beyer's colour scheme which includes shading, using a deep dark and and accent, from her book Color Confidence for Quilters.

centre
I also used a Jinny Beyer border print for the centre block, in the 6” blocks and most of the the solid borders.

quilt back and binding


label

Quilt Name: Jewel Tone – Medallion IV
Description: Medallion
Pattern: Original
Size: 79” x 94”
Fabrics: 100% cotton, hand-dyed muslin and hand-dyed white-on-white cotton
Predominant colours: Jewel tones
Construction Techniques: Twelve pieced and plain borders were added around a central square.
Back: Hand-dyed white-on-white cotton
Batting: Hobbs 80/20
Edge finish: Double fold french binding – Mottled Black
Quilting: Long arm machine quilted
Quilted by: Marnie Mascioli from Calico Cat Quilting
Sleeve: Yes
Label: Yes
Date completed: 2010
Inspiration: The colours for this quilt were chosen using Jinny Beyer's colour scheme which includes shading, using a deep dark and and accent, from her book Color Confidence for Quilters.
Appraised: No
Quilt History: This quilt was displayed in the Kirkland Lake Mile of Gold Quilter's Guild 2011 Annual Quilt Show in May
Maker: Terry Whyte


Thursday, December 22, 2011

UFO Challenge List


UFO Challenge 2012

This year, I've decided to join  2012 UFO Challenge at Patchwork Times .  I found Judy Laquidara's blog last year, but it was too late to join in.

I love challenges, so I'm hoping to get most of these done and off my list.

The idea is to list 12 quilts and on the first of each month Judy will pick a number and the UFO that corresponds to that number is the one that will be finished that month.

After searching through my closets, storage boxes, etc. I found so many UFOs (unfinished projects) it was hard to pick only 12 .  They are now all rounded up on a couple of shelves and a few boxes.

I decided to break them down into large, medium, and small sizes, so I would not end up with all large projects every month. I chose some I would like to work on, some that can be given away and some I thought had been in hiding forever and should come out of the closet.

So, here is my list:

1 – Blue Log Cabin

This has been around a long, long time and I just want to get it done. It is king size and it will be long arm quilted. I have to prepare a back, have it quilted, label and bind it. Measures 106” x 106”.
1/4 of a log cabin
2 – Sampler

I have several sets of sampler blocks that I made while teaching my Sampler Classes so it would be great to get another one finished. I have an idea for the setting for this one, so this one it is. 15 – 12” blocks are completed, one to finish piecing.

Sampler
3 – Brown Pinwheel 

Top is made, needs borders and everything else. Measures 40” x 50” without borders.

Brown Pinwheel
4 – White Blocks

These are blocks that I had totally forgotten about. I'm pretty sure these were made as part of a Mystery Quilt from a magazine. Probably from the early or mid '90s, I started quilting in 1988. There's all kinds of pieces cut out and 18 blocks made , some cotton, some polyester. This one should be interesting. 10” blocks

White Blocks

5 – Going in Circles

Finish quilting, and bind.
This one is almost done, it's been a stop and go quilt for years. 
Measures 36” x 36”.

Going in Circles

There's even a label stitched in, reads 2007, and I know that's just when I got to the quilting. Had good intentions.


6 – Advanced Sampler

These are 6 of the 12 blocks, all are finished. Needs to be set, quilted, labelled and bound. 12” x 12” blocks. These blocks were made when teaching, see Original Advanced Sampler here.
Advanced Sampler

7– Strippie

This was a guild project where a strip was made each month. All the strips but 2 are liberated blocks (no patterns). It needs to be set, quilted, labelled and bound. Strips measure 30” long.

Strippie

8 - Mine Shafts

Not sure what I do with this one. Needs quilting and binding. Measures 33” x 43”.


O Tattenbaum III,  IV and V

There were four of these and they were originally going to be part of a table topper, but have already made one into a small wall hanging. Will finish these individually as wall hangings or cushions. These blocks measure 13” x 13”. See O Tattenbaum I and II here.


9 - O Tattenbaum V
O Tannenbaum V
10 - O Tattenbaum III (as above)

O Tannenbaum III
11 - O Tattenbaum IV(as above)

O Tannenbaum I


12 -Tag Placemat
Three are finished, five are partially quilted, some not. Measure 12” x 16”.


WISH ME LUCK!

Terry

Christmas Oldies


Quilts # 65 – 66 and a Bunch of Assorted Christmas Projects


This pretty much takes care of Christmas Projects made over the years.
The ones today are some of the first projects I made when I started quilting over 20 years. Most come out every year, it's fun to reminisce.

Merry Christmas and thanks for stopping by.


65 - Christmas Wreath

Christmas Wreath 
Can't remember where I found the pattern, but I still rather like this one. 
The 3-D Bow just adds a little something to the ribbon border.

3-D Bow
Again, a mixture of cotton and polyester, some machine quilting, some hand quilting.
Measures 30” x 30”.
back

66 - Christmas Bells

Christmas Bells

The Christmas Bells was the first Holiday wall hanging I ever made.
It is hand appliqued and has white pompons for the bell clappers.
Most of the fabric is polyester, the bells are cotton, measures 20” x 25”
The writing was hand embroidered and it was very sparsely hand quilted around the designs.
The pattern was from the very first quilting book I ever bought and it was not easy to come by, there were very few quilting books or magazine available in Canada in the late eighties.
We've come a long way, baby.


Tree Skirt
The little ribbon bows were machine stitched through to hold the layers together.

Tree Skirt

Two Star Table Runners
Table Runners fronts

Table Runners backs


Two Woven and Quilted Placemats

Placemats - one front and one back


Table Topper


Christmas Stockings


Wednesday, December 21, 2011

O Tannenbaum


Quilts #63 – 64 + 2 Christmas Stockings


O Tannenbaum I

I found an article by Maurine Roy who made a beautiful “Heart” quilt, she shared her technique in the magazine.
I wanted to try the technique without copying her heart pattern, so I designed a stylized tree. The method involves layering 2 fabrics, stitching and then cutting away. The decorative stitches cover the raw edges.
I love this technique and have used to make several of these trees as well as a couple of Christmas stockings.


Quilt # 63
O Tannenbaum I

This table topper is made up of 4 squares (12½” finished) and the border was cut 3” wide.
The green fabrics are all batiks, the black are 100% cotton and the thread is a Coats and Clarks gold coloured rayon.

centre & stitching 
detail at border, binding, 


Reverse Side

This quilt is reversible to a Crazy Patchwork that I had made and was waiting to quilt. The colours were right, and the size was almost big enough. I simply made my binding wider on that side to cover the shortfall.

Reversible to crazy patchwork 
I used many of the decorative stitches on my machine to decorate the patchwork. A red, gold and black on the dark patches and pale green to white variegated rayon on the light patches.
Decorative stitches
Decorative Stitches

The quilt measures 30” x 30” and made in 2005.

Quilt #64

O Tannenbaum II

O Tannenbaum II
I scaled down to this little wallhanging for a class sample.
There is a very skinny little border in turquoise and then 4 large triangles were added to square up the block.
The pattern on the fabric inspired me to quilt a grid all over the background.
detail of stitching, skinny border and quilting
The binding was cut with a curvy rotary blade, fused and then stitched with a decorative stitch.
Back, label and binding

The fabric on the front is all batik, the back is one of my hand-dyed.
This one was completed in 2009 and measure 18" x 18".


Christmas Stockings


These are the stockings I made for my two grandsons, Maximus and Massimo (Max and Mamo).


Since the shape of the letter could be mirrored, it worked in my favour in order to be able to use this method.


Sunday, December 18, 2011

3-D Christmas Tree Cardholder

Quilt #62

3-D Christmas Tree Cardholder

The tree in this cardholder quilt is a design by Jackie Robinson.

detail

The “branches” are 3-d folded triangles which are then caught in the seam allowances.

detail - pockets

Three pockets to hold Christmas cards were added at the bottom of the tree.

back
A couple of wide loop were made and stitched through when the quilt was put together using 
the pillowcase method.


The quilting is a combination of straight lines and stippling.


This quilt measures 29" wide x 25" and was made in 1999. 

Thursday, December 15, 2011

Old Fashioned Santas


Quilt #61

Old Fashioned Santas
This little quilt was made way back in 1997 from a picture I saw in a magazine. The Santas have beards made of thermolam batting, glass beads for eyes and fuzzy wool for trim. The applique was fused and stitched with a straight stitch along the edges.

Santa
The chekerboard background is embellished with a variety of neutral coloured buttons.

checkerboard background
The batting is thermolam and the quilting is stitch-in-the-ditch and diagonal lines on the squares that do not have buttons.
back


Old Fashioned Santas measures 18” x 25”.

Wednesday, December 14, 2011

Stack-n-Whack Morning Star Placemats and Table Topper


# 60

Stack-n-Whack Morning Star Placemats 
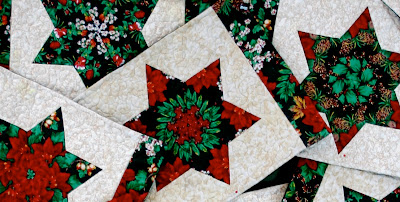
The pattern for these stars are from Bethany S. Reynolds' book Magic Stack-n-Whack Quilts. Hers were made into quilts, I thought this pattern would be great for Christmas placemats with the addition of strips of the main fabric on either side. 

Close-up
Six – 60˚ diamonds form the stars, all cut from one busy Christmas fabric which gave me lots of variety. Two different similar light backgrounds were used simply because I ran out of one when I decided to keep making more.


Main fabric (back of table topper)
 The main fabric used for the stars also backs the table topper.


Table Topper
 A dark green print was used for the back of the placemats.

back of placemat
I kept the quilting simple with stitching-in-the-ditch around the diamond shapes and doing a large stipple on the background.

These measure 12” x 16” and were Made in 2000.