Showing posts with label Mixed Media. Show all posts

Thursday, November 27, 2014

Working in a Series – Birds – Part 6


Working in a Series – Birds – Part 6


Quilt Documentation 178 – 179

These small quilts are exercises from Art Quilt Workbook by Jane Davila & Elin Waterston.  
All measure 9" x 12".
(see first post here)

Found Objects

Objects that are not too heavy or too fragile, that are mostly two-dimensional and that are not too big work best in art quilts.
Paper, natural objects, man-made objects can be attached by hand or machine, glued, wired or fused.

Quilt Documentation 178

"Birds - 10"

The found objects in this quilt include:
scrapbooking paper, brown paper stamped with my crow stamp, painted newspaper, map, a small collage of melted plastic shopping bags on textured background, a pair of old earings (backs removed and attached with embroidery thread) and couched wool.

I also couched the same wool around the edges for a binding.


"Birds 10 - Found Objects

"Birds 10 - Found Objects - back


Embellishments

There is no end to what can be used for embellishing, beads, buttons, shisha mirrors, sequins, trims, and charms, just to name a few.


Quilt Documentation 179

"Birds -11"

For this quilt, I placed my batting onto the fabric I wanted to use for the back and wrapped the edges around the batting on the front. I stitched a piece of stabilizer that had been painted or dyed. A piece of trim added a skinny border just inside the raw edges. The dyed cheesecloth was hand stitched and then appliqued with a chickadee printed on cotton. Beads and little rings from an old necklace finished it off.
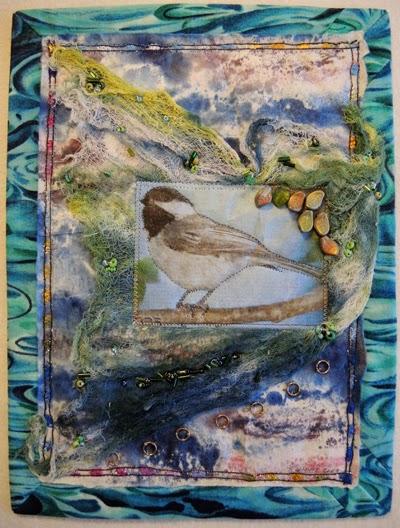
"Birds 11 - Embellishments

"Birds 11 - Embellishments - back


Art Quilt Workbook by Jane Davila & Elin Waterston is full of ideas and suggestions, and gives you enough instructions on how to use certain products or techniques to get you going.

I really enjoyed the process of making this series of little quilts and learned a lot.

Learn and have fun by doing, it doesn't have to turn out perfect every time.

Just go for it!

Happy Quilting,

Terry


Monday, November 24, 2014

Working in a Series – Birds – Part 4


Quilt Documentation 173 - 174


These small quilts are exercises from Art Quilt Workbook by Jane Davila & Elin Waterston.  
All measure 9" x 12".
(see first post here)

Stamping

Stamps can be:
ready-made - purchased
original - hand made from many different materials
found - from natural objects or all kinds of tools or items just laying in and out of your house.

Quilt Documentation 173

"Birds - 5"

The background is made up of curved and straight piecing.
I cut a little crow stamp from fun foam and changed the orientation a little so even though it is the same stamp, they look a little different. I like how the gold from the fabric came through the ink.
The leaves are from a block stamp that I kept turning in different directions to avoid the “blocky” look. I also stitched over some of the leaves and added a few extra of my own.
Machine quilting and some french knots completed this quilt.


Birds 5 - Stamping

Birds 5 - Stamping - back

Foiling

Metallic foils can be transferred to fabric using liquid glue, fusible web, or bonding powder.

Quilt Documentation 174

"Birds - 6"

I appliqued a couple of rectangles to the background using a machine buttonhole stitch.
I then cut out bird shapes from fusible web and fused them to the pieced background and applied the foil.
There's a feather (from my duster ;) behind some tulle in the corner.
I added a little quilting, some buttons and beads to finish the piece.
The binding is from a piece of variegated organza wrapped around the edges.

Birds 6 - Foiling

Birds 6 - Foiling - back
More to come.

Happy Quilting,

Terry


Friday, October 31, 2014

Lutradur Poppy and Poinsettia


ART PROMPT - #15 – Use Lutradur

Lutradur Poppy and Poinsettia

The Englehart Area Artists hold a yearly Christmas Tyme Sale to coincide with The Unveiling of Christmas.   Area artists and crafters bring in their goods and the sale articles are placed “boutique style” throughout the hall.

Club members are also asked to participate by making one or two 12” x 12” canvases to sell at this event.

This year's theme was red, green and a touch of gold.

The Lutradur prompt came along at just the right time for this project.

I started by drawing on the Lutradur and adding layers of acrylic paint starting with a layer of white and adding 1 or 2 layers of colour.

drawing on lutradur


white layer of acrylic paint

second layer

third layer


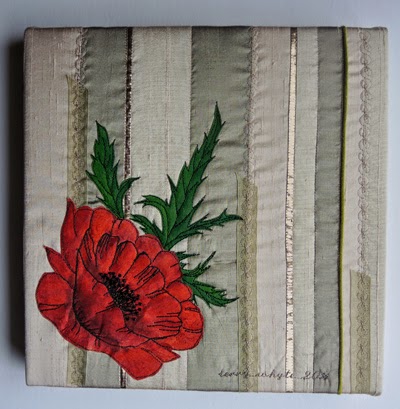
For my background, I cut three different beige silk fabrics into random width strips to stitch together. I added a couple of skinny strips of shiny gold fabric (not lame, but similar) and a strip of light green piping to each panel.


stitched panel

detail

I added a layer of thin wool batting and quilted in the ditch.

I then placed 3 lenghts of green sheer ribbon on seams and used a decorative machine stitch over the seam and ribbon.

After cutting out and appliqueing the lutradur flowers and leaves, I changed my mind and decided I liked the looks of the ones I had outlined in black best, so I went back and did them all the same.
leaves before black outline stitch 

black stitching in progress


I also thought I needed to add some dark values so the paint came back out. The nice part of using lutradur is that acrylic paint barely seep through it, so it can still be painted after it is attached to the fabric.
darker values added
 And here are the finished pieces, wrapped and stapled to 12” x 12” canvases:


Lutradur Poinsettia

Lutradur Poppy
See you next time,

Terry


NEXT ART PROMPT - #16 – cover up something


HERE'S MY “ART PROMPT” PLAN

One prompt, one project (taking as long as required to finish the project)

It's OK to finish or use a previously started project (UFO) as a starting point.

Make something creative.

Use any Media.

Blog about the project.

Pick another prompt once the project is done.


Wednesday, June 18, 2014

Ribboned Moon

ART PROMPT - #10 – Use tulle


Ribboned Mood -- In my mind I call it "Tulle Time"


This quilt has been finished for a while but I just have not had time to blog about it.

I drew the design on the back, then covered the front with one piece of tulle at a time and stitched from the back and trimmed.


design drawn on back (pencil)

I then added trapunto (2 layers) it's a little more puffy than I wanted. Sorry, forgot to take photos of trapunto.

Here it is before trapunto and quilting
Add caption

Blocked (wet)


Blocked - wet

Dry and  trimmed


Dry - trimmed 
I like this orientation better, but it can be hung either way.

The back complete with hanging slat and label

back
Quilt measures 38" x 15".

My “plan” has changed again! I like to call it a “plan” rather than rules. I don't seem to follow rules very well.
See you next time,

Terry

NEXT ART PROMPT - #11 – Add string

HERE'S MY PLAN

One prompt, one project (taking as long as required to finish the project)

It's OK to finish or use a previously started project (UFO) as a starting point.

Make something creative.

Use any Media.

Blog about the project.

Pick another prompt once the project is done.


Wednesday, June 11, 2014

CQA Best of Show


A phone call last night, from Marnie, who was attending the CQA National Juried Show in St Catherines made my day!

The Northern Ontario Fibre Artists (NOFA) are very excited and honoured to have won Best of Show in the Canadian Quilters Association National Juried Show.

Here is our entry “Seven Create”. It measures 10 feet by 55 inches.

Seven Create
The members of NOFA are Marie Black, Silvia Bos, Jane Hughes, Marnie Mascioli, Kit Ormsby, Karen Pilch and Terry Whyte.

I blogged about “Seven Create” here if you are interested about how this project started and progressed to completion.

Linking up to The Needle and Thread Network and Nina-Marie's Off the Wall Friday.

Thanks for stopping by.

Happy Quilting,

Terry


Friday, April 18, 2014

Three x 3

Three x 3 is a mixed media piece I made especially to enter in the 7th Annual Juried Contemporary Exhibit at the Museum of Northern History in Kirkland Lake, ON.  See previous post here. 


Three x 3


The theme was Nature’s Enduring Bounty and use of natural material was encouraged.

I used three techniques and made nine 5" x 7" canvases arranged on a 3 x 3 grid.

Unfortunately, I did not take any pictures of work in progress.

I started with pages from a book of poems which I gessoed and stained with coffee. 

I needed to glue the pages to muslin in order to be able to attach the natural branches.

When I applied the glue, the coffee stain (not waterproof) mixed with the glue and puddled on the paper. 

This was not the look I was going for but I thought it worked.
detail

First technique: 

I used real branches from my Linden tree and attached (couched?) them to my prepared background. 

The fabric was then wrapped around the canvases.
natural branches


Second technique: 

I reproduced the design of the branches by painting them on with acrylics.
painted - acrylics

Third technique:  

I made stamps from "fun foam" and stamped on the background.

stamped 
My background panel was then wrapped with a piece of my own hand-dyed muslin and the little canvases glued on.


Happy Quilting,

Terry

Wednesday, April 16, 2014

Contemporary Art Exhibition 2014


7th Annual Juried Contemporary Art Exhibition 2014 is currently on display at the Museum of Northern History in Kirkland Lake until May 3rd.

Artists at all stages in their career were eligible and all disciplines welcome.

Theme: Nature’s Enduring Bounty and use of natural material was encouraged.

The guest artist was Cecilia Stelini from Brazil.

I had two pieces juried into this exhibit.

I made Three x 3 especially for this show. See my next post for more details.


Three x 3
 This is Renewal and there is more about it here.

Renewal
Here's a couple of sneak peeks that were sent out by the Museum prior to the Open House and included here with their permission.

My 2 pieces on left panel
more exhibits


Happy Quilting,

Terry

Sunday, April 13, 2014

NOFA Meeting April 12, 2014


Northern Ontario Fibre Artists met on Saturday for our spring meeting. 

We had a good showing of projects for our Show and Tell.

After a delicious pot luck lunch, we headed in to the Museum of Northern History in Kirkland Lake for the Open House of the 7th Annual Contemporary Show (see next post).

Here are some of our work in progress and finished projects:

Silvia (12" x 12" canvases)

Prints Terry & Marie

Print by Marie - Drawn Thread Embroidery by Silvia

Prints & Painted Envelopes by Marie
3-D Flower by Silvia
Photo of Altar Cloth by Karen (see below)
Commissioned Altar Cloth by Karen (60" wide)
 
Marie

Terry
Silvia

Terry
Marie

Terry


Happy Quilting

Terry

Thursday, April 10, 2014

ART PROMPT - #8 - Add a strong diagonal


Greeting Cards and Postcards - Albatross Stamp


Greeting cards

After taking the printmaking workshop, I really wanted to make another stamp. I liked the
4” x 6” format and since I also wanted to make greeting cards and postcards, it was the perfect size.

I found a picture of an albatross with a strong diagonal. This is my pattern and my carved stamp.

pattern and stamp
I'm not sure what the product is. It is softer than lino but firmer than the soft-kut that I have used before.

I experimented with making greeting cards. Some were printed with Screen Printing Ink and some with Jacquard Textile Color.

Screen Printing ink on light blue cardstock

Screen Printing ink on white cardstock - added watercolour paint after printing

Jacquard Textile Color on white cardstock - added watercolour paint before printing

Jacquard Textile Color on heavy paper - added watercolour paint after  printing - machine stitching

Also made a couple of postcards.

Jacquard Textile Color on own handdyed cotton - machine stitching & satin-stitch edges

Jacquard Textile Color on silk and organza collage - machine stitching & satin-stitch edges

Still lots to play with and so many other options to try.

more printed fabric to play with

See you next week,

Terry

NEXT ART PROMPT - #9 – Add wire

HERE'S MY PLAN

One prompt, one project (taking as long as required to finish the project)

It's OK to finish a previously started project (UFO)

Make something creative.

Use any Media.

Blog about the project every Friday.

Pick a prompt for the next week once the project is done.