Showing posts with label Series. Show all posts

Thursday, November 27, 2014

Working in a Series – Birds – Part 6


Working in a Series – Birds – Part 6


Quilt Documentation 178 – 179

These small quilts are exercises from Art Quilt Workbook by Jane Davila & Elin Waterston.  
All measure 9" x 12".
(see first post here)

Found Objects

Objects that are not too heavy or too fragile, that are mostly two-dimensional and that are not too big work best in art quilts.
Paper, natural objects, man-made objects can be attached by hand or machine, glued, wired or fused.

Quilt Documentation 178

"Birds - 10"

The found objects in this quilt include:
scrapbooking paper, brown paper stamped with my crow stamp, painted newspaper, map, a small collage of melted plastic shopping bags on textured background, a pair of old earings (backs removed and attached with embroidery thread) and couched wool.

I also couched the same wool around the edges for a binding.


"Birds 10 - Found Objects

"Birds 10 - Found Objects - back


Embellishments

There is no end to what can be used for embellishing, beads, buttons, shisha mirrors, sequins, trims, and charms, just to name a few.


Quilt Documentation 179

"Birds -11"

For this quilt, I placed my batting onto the fabric I wanted to use for the back and wrapped the edges around the batting on the front. I stitched a piece of stabilizer that had been painted or dyed. A piece of trim added a skinny border just inside the raw edges. The dyed cheesecloth was hand stitched and then appliqued with a chickadee printed on cotton. Beads and little rings from an old necklace finished it off.
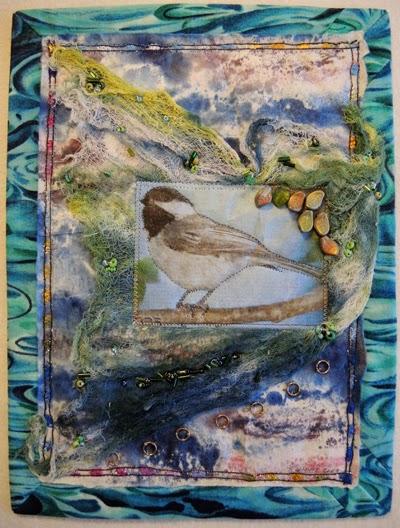
"Birds 11 - Embellishments

"Birds 11 - Embellishments - back


Art Quilt Workbook by Jane Davila & Elin Waterston is full of ideas and suggestions, and gives you enough instructions on how to use certain products or techniques to get you going.

I really enjoyed the process of making this series of little quilts and learned a lot.

Learn and have fun by doing, it doesn't have to turn out perfect every time.

Just go for it!

Happy Quilting,

Terry


Tuesday, November 25, 2014

Working in a Series – Birds – Part 5


Quilt Documentation 175 – 176 - 177


These small quilts are exercises from Art Quilt Workbook by Jane Davila & Elin Waterston.  
All measure 9" x 12".
(see first post here)

Thread Work

Thread painting, bobbin drawing, couching and free-motion quilting are all means of visual expression that use thread as a medium.

Thread Painting

Quilt Documentation 175

"Birds - 7"

Blue Jay was thread painted on a separate fabric, cut out and then appliqued over my quilted background.
The yellow-green square behind the bird was printed with circles. I free-motioned zig-zagged around the circles.
Some beading on little blue squares add more interest.


"Birds 7 - Thread Painting

"Birds 7 - Thread Painting - back

Bobbin Drawing

Quilt Documentation 176

"Birds - 8"
This bird was thread painted directly on the fabric before sandwiching the layers to do the bobbin drawing of the cage.
The sparkly heavier thread was placed in the bobbin and stitched from the back.
I added a facing and followed the outline of the cage, just for fun.

"Birds 8 - Bobbin Drawing 

"Birds 8 - Bobbin Drawing - back

Free-Motion Quilting

Quilt Documentation 177

"Birds – 9"

Toucan is a simple applique with busy free motion quilting in the background.
I think it balances out.

"Birds 9" - Free motion quilting
"Birds 9" - Free motion quilting - back
More to come.

Link to The Needle and Thread Network.

Happy Quilting,

Terry

Monday, November 24, 2014

Working in a Series – Birds – Part 4


Quilt Documentation 173 - 174


These small quilts are exercises from Art Quilt Workbook by Jane Davila & Elin Waterston.  
All measure 9" x 12".
(see first post here)

Stamping

Stamps can be:
ready-made - purchased
original - hand made from many different materials
found - from natural objects or all kinds of tools or items just laying in and out of your house.

Quilt Documentation 173

"Birds - 5"

The background is made up of curved and straight piecing.
I cut a little crow stamp from fun foam and changed the orientation a little so even though it is the same stamp, they look a little different. I like how the gold from the fabric came through the ink.
The leaves are from a block stamp that I kept turning in different directions to avoid the “blocky” look. I also stitched over some of the leaves and added a few extra of my own.
Machine quilting and some french knots completed this quilt.


Birds 5 - Stamping

Birds 5 - Stamping - back

Foiling

Metallic foils can be transferred to fabric using liquid glue, fusible web, or bonding powder.

Quilt Documentation 174

"Birds - 6"

I appliqued a couple of rectangles to the background using a machine buttonhole stitch.
I then cut out bird shapes from fusible web and fused them to the pieced background and applied the foil.
There's a feather (from my duster ;) behind some tulle in the corner.
I added a little quilting, some buttons and beads to finish the piece.
The binding is from a piece of variegated organza wrapped around the edges.

Birds 6 - Foiling

Birds 6 - Foiling - back
More to come.

Happy Quilting,

Terry


Sunday, November 23, 2014

Working in a Series – Birds – Part 3

Quilt Documentation 171 - 172


These small quilts are exercises from Art Quilt Workbook by Jane Davila & Elin Waterston.
All measure 9" x 12".
(see first post here)


Innovative Piecing

Several ideas were covered, machine-pieced freehand curves, wonky piecing, insert strips.

Quilt Documentation 171

"Birds - 3"

I chose to make Wonky Log Cabin Blocks using my own photos, printed on fabric of a crane walking along the beachfront, as the centre of the block.


"Birds - 3"  Wonky Log Cabin Blocks

"Birds - 3"  Wonky Log Cabin Blocks - back
Paint Effects

Exercises included either abstract or representational painting.

Quilt Documentation 172

"Birds - 4"

On this quilt, the birds as well as the branches are painted on batik. The tree trunk is a black cotton applique which also had light paint added on the right side. Stitching with black and grey threads added more shading.
The background was quilted with a grey and black variegated rayon thread.
I wish I could remember what I used for the painting, maybe ink as it has a very soft hand.
"Birds - 4"  Paint Effects


"Birds - 4"  Paint Effects - back
More to come.

Happy Quilting,

Terry

Working in a Series – Birds – Part 2

Quilt Documentation 169 - 170


(see previous post here)

Collage with a Focus

These collages contain a central image, other elements emphasize or accentuate the image to create an interesting visual arrangement.

Quilt Documentation 169

"Birds - 1"

This collage uses a printed fabric image, the swirling turquoise fabric representing water.

"Birds - 1" Collage with a Focus
"Birds - 1" Collage with a Focus - back

Quilt Documentation 170

"Birds - 2"

For the second collage, I printed one of my own photos of a goose on a post onto fabric.
I added another “sign post” on the left of the picture and some mother of pearl pieces which have a “watery” look.

I experimented with a fused binding that I cut with a wavy rotary blade and then programmed a leaf stitch on my machine to add to the edges.

"Birds - 2" Collage with a Focus
"Birds - 2" Collage with a Focus -back

More tomorrow.

Happy Quilting,

Terry

Working in a Series - Birds

Quilt Documentation 166 - 167 - 168


After a week of sun and fun in Punta Cana to celebrate our 50th Wedding Anniversary and a few days in Toronto (rain and snow – not so fun), I'm ready to get back in my sewing room and sew, sew, sew!

I'm working on Part 2 of my Art Prompt #16 project “Covering up Something” and liking what is happening so far.

In the meantime, I'll post my “Bird Series” from 2008 and 2009 .

I purchased Art Quilt Workbook by Jane Davila & Elin Waterston back in 2008 and worked through the book – first doing several exercises on paper and then making three practice quilts before starting work on the Bird Series.


My chosen theme was “Birds”.

All quilts are 9” x 12”.


It is suggested to use a Controlled Palette throughout the series, using these fabrics and fabrics that go with these, plus an occasional deviant colour. The quilts in the series will play well together and the series will be more cohesive.

This is my Controlled Palette:

Controlled Palette

And these are the three exercises from the book.

Quilt Documentation 166

Working from a Pattern – Pear Quilt - front and back

Pear Quilt - front 


Pear Quilt - back

Quilt Documentation 167

Working from an Original Drawing of a photo – Sammy - front and back

Sammy - front 
Sammy -  back
Quilt Documentation  168

Colour Collage – Three Organic Shapes (not too representational) arranged on a Background - front and back

Colour Collage – front
Colour Collage – back


See you tomorrow with a Bird Quilt.

Link to Nina-Marie's Off the Wall Friday.

Happy Quilting,

Terry

Wednesday, November 20, 2013

Fern Study 3, 4, 5


Quilt Documentation # 146, 150, 151

This all started when we did some plein air printing during our summer retreat.

The ferns were used as a stamp as well as a resist and I experimented with different techniques over the prints.


Fern Study 3, 4, 5 separated

Fern Study 3, 4, 5 zipped together
This is what these 3 prints looked like prior to embroidering.

fern prints
Fern Study #3 was hand embroidered using sashiko thread.

Fern Study 3 - hand embroidered

Fern Study #4 was thread painted on the machine and I outline stitched the ghost print with yellow thread.

Fern Study 4 - thread painted
Fern Study #5 was a ghost print that I outline stitched with metallic thread and then painted with Tsukineko Ink.

Fern Study 5 -stitched and ink painted

This is what the back looks like and I haven't added any sleeves yet but I might.

backs

Do I want these as wall quilts????

 OR........looks what happens when they are all zipped (zippered)?  together.

All 3 panels zipped up

OR maybe separated them like this.......
One and two

OR like this..........
Individuall

OH WAIT!  Look what fits perfectly inside ......


Perfect fit
So much fun!!! 

Still not sure what I will do with them.

Each quilt measures 10" x 14".


Happy Quilting,

Terry


Thursday, August 22, 2013

Fern Study 3


Quilt Documentation # 146 

Work in Progess

Fern Study 3

Not a lot going on in the sewing room this summer, but I managed to get in there for a few hours to get another piece done in my Fern Study series.

I have mostly been learning embroidery stitches with Sharon Boggon at pintangle.com. She posts a new stitch every week on her blog. The challenge is called Take a Stitch Tuesday.

I used a couple of very basic stitches on Fern Study 3.

This is one of the prints made earlier this summer using ferns and black acrylic paint.

Ink Print

This piece started as a resist, so the “feathering around the fern” is from brushing over the fern on the white fabric. It was pretty messy so I stamped the fern over the white space.

The thread used for the hand embroidery is 100% cotton Japanese Sashiko thread.

I wanted to machine stitch around the embroidery but knew that my free motion foot would keep getting caught in the stitches so I decided to try Glad Press 'n Seal.

Glad Press 'n Seal

I placed it over the whole piece, this stuff will stick to everything, and then stitched with gold metallic thread.

free motion quilting with metallic thread 


I removed the Press 'n Seal from around the edge, it came off easily (forgot to take a picture) and then did the background quilting.
I wasn't sure how to remove the rest of the plastic so after a little experimenting I found that by ironing over a sheet of parchment paper the Press 'n Seal just melted off.  Since everything was either 100% cotton and metallic, it worked great.

detail

The border is not quilted as I'm waiting to see what happens with the next 2 pieces. I'm hoping this will be part of either a triptych or diptych if the one or both of these other pieces turn out OK.

You can see Fern Study 1 and 2 here.

Linking to Nina Marie's Off the Wall Friday.  Have a look at all the beautiful fibre art there.

Happy Quilting.

Terry