Tuesday, February 19, 2013

Ocean Waves


Quilt Documentation # 120

Ocean Waves
Just a little quilt that I made to experiment with Kim Thittichai's techniques as shown in her book Hot Textiles – Inspiration and Techniques with Heat Tools.

The techniques I used were:
Painting fusible web and applying it to my background fabric (orange and blue).
Melted plastic shopping bags sandwiched with parchment paper and ironed until some melting occurred (grey near the botton edge).
Applied foil to the fusible web using the edge of the iron.'
Used puff paint to create the foam in the waves.

Ocean Waves - detail
I added some borders and quilted using metallic thread. It measures 13” w. X 11” h.

An orphan block that I added triangles and an edge strip to, became the the back of the quilt. I'm not sure when this was made as I had not signed or dated this quilt. I have now signed it. A good reminder to at least add your name and year even you don't have to make a label.

back

This was a lots of fun to make

Terry.

Thursday, February 14, 2013

Work in Progress


This is what I have been working on this week and I hope to finish it today, but I can only show a couple of little peeks as this is for a competition.


This is what I started with:

Mono print, hand dyed, black solid and thread

Sneak peeks: it's a two-part thing!

Here is part 1

Part 1
And part 2

Part 2

If it doesn't get juried in, you will see it sooner than later.

Wish me luck!

Terry


Wednesday, February 13, 2013

Red Tree


Quilt Documentation # 119

Red Tree was made back in 2007 when I was experimenting with painting on fusible web with acrylics.


After the paint is dry, the fusible web has to be ironed on using a piece of parchment paper. A light hand is needed or the fusible web will go shiny. This method gets interesting results but the drawback is that once applied it cannot be touched with an iron (without parchment paper) or it will stick to the iron and melt.

In this quilt I applied 3 overlapping layers to get the sky section to go from light to dark.  The tree trunk was appliqued and the branches were thread painted.


The shadows on the ground are also made from using painted web.


I like the back of my quilts to look nice but also add a little surprise or something extra.  On this one I put a heavy thread in the bobbin at the quilting stage and outlined the tree and some of the background and borders.


This little monochromatic quilt measures12¾” x 16½”.

Sometimes it's just fun to play.

Terry

Sunday, February 10, 2013

Nodding in the Dark


Quilt Documentation #118

This little quilt is the result of a monoprint made on black cotton using metallic paints. It measures 13” x 14½ “ and was made in 2011.

Nodding in the Dark

Unfortunately I did not take a picture of the print before stitching.

I stitched green leaves and stems over the splotches of brown and green and used a variegated yellow gold thread for the flowers. The background was stippled using angled straight lines instead of curvy stitches.

Nodding in the Dark - back
Once quilted, the piece was faced using bias corners, a sleeve and an label printed on ExtravOrganza .

label and facing

Wednesday, February 6, 2013

Back Home & Postcard Fun

BACK HOME

I loved New Zealand!  What a wonderful holiday. Cruising is great, no packing and hauling luggage around but still get to go on excursions and then, of course, all the good food. I met wonderful people and had lots of fun and even took quilting workshops on the days at sea.

And to top it all off, I got to spend almost a week with family in Vancouver on my way back home.

POSTCARD FUN

After being away on holidays for 3 weeks and the blog for a month, it is hard to get back in the groove.

I did miss my sewing machine, so time to play.  I decided to have some fun with postcards.

FOUR cards from one little kit!
I had made some kits (scraps) with the idea of teaching a class, so thought it might be a good idea to do a test run and see if the kits would work.

I chose a kit at random and these were the contents:


contents of kit

This is my first background, stitched with a decorative stitch and quilted:

background - decorative stitch and quilted

First card "Funky Flower":
Funky Flower

The second card turned into a little abstract. 
This was the process:


pieced
quilted

Abstract


Still lots of scraps left:


Made “Swan in the Moonlight “ which turned out to be my favourite.

Swan in the moonlight
At this point I'm obsessed with seeing If I can squeeze one more card out of the little bag of scraps.
Yes!
Tic tac toe!
Tic Tac Toe
I like to play with scraps and see what I can come up with.  I find that limiting supplies to use in a project can really get the creative juices flowing and  usually makes the results fun and interesting.


The results and left-overs

I had fun making these.
Hope you enjoy looking!
Thanks for coming.

Linking to NinaMarie's Off the Wall Friday and The Needle and Thread Network - WIP.  Check it out for all Canadian bloggers. 

Terry

Tuesday, January 8, 2013

Tango

Quilt #117
Tango

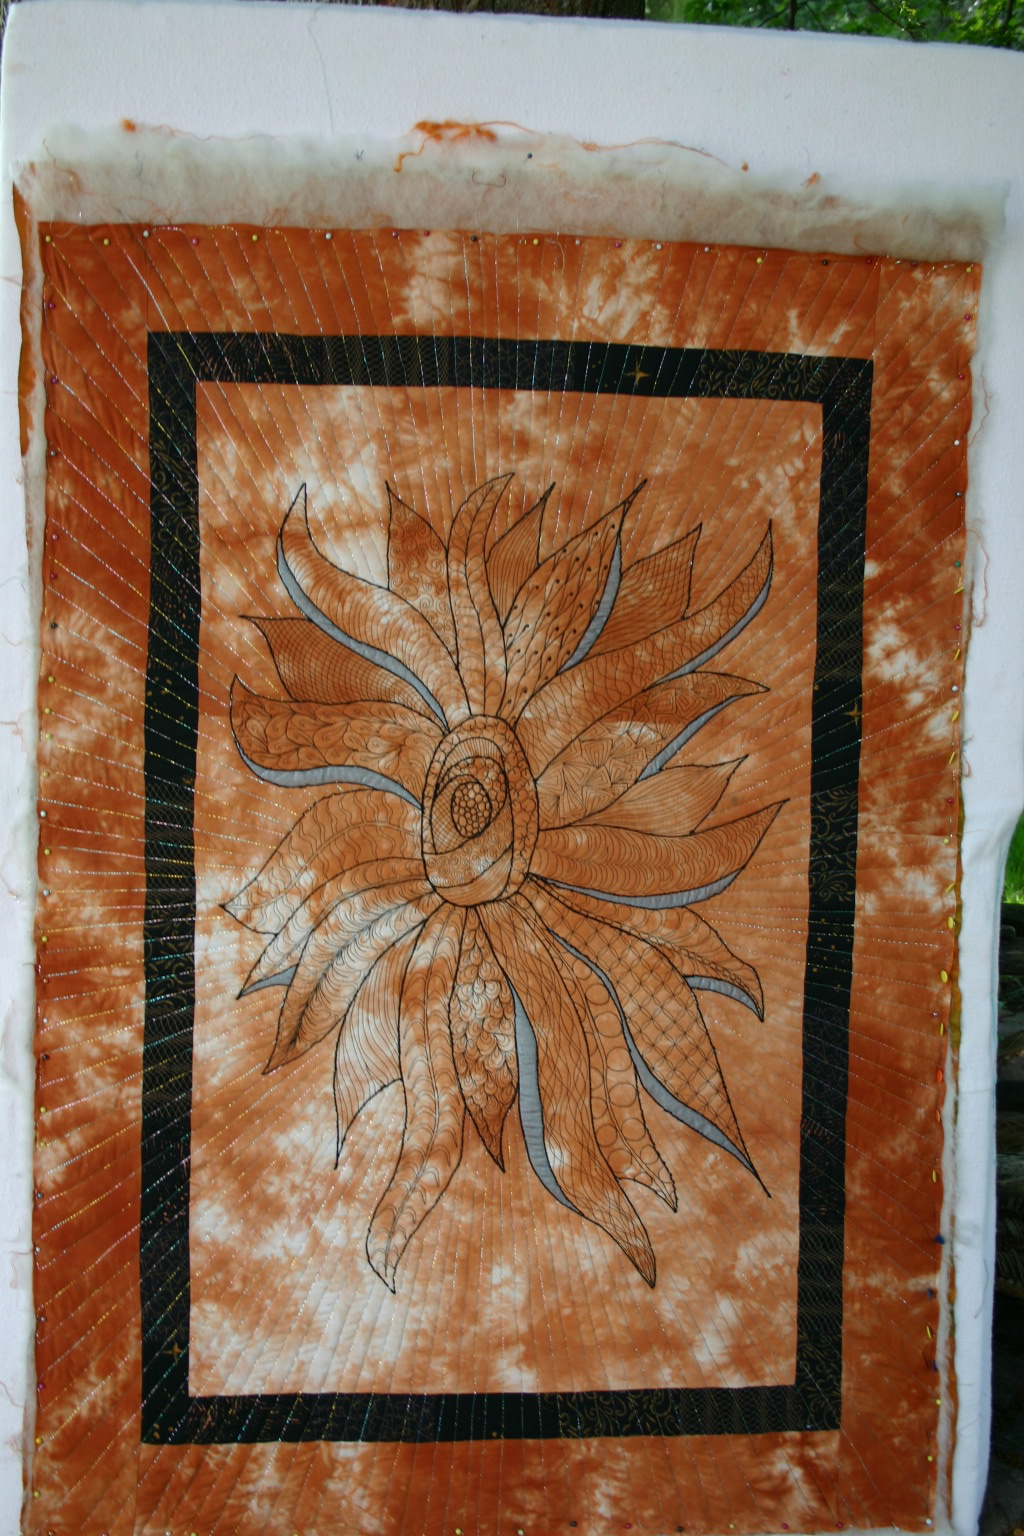
Tango is an original design and came about as a result of a doodle on a small scrap of paper. It is a zentangle in fabric and thread with a lot of the quilting designs inspired by Leah Day.

The background fabric is my own hand dyed with a pieced inner border of black printed fabrics. The back of the quilt is a hand woven Thai silk.

Top and silk for back

After enlarging my design, I copied it onto my prepared background and stitched the outline. All the designs in the leaves were free motion quilted on a domestic sewing machine.

Both the top and back were very distorted after quilting the centre. 

distorted top

distorted back
At this point I had to block the quilt in order to be able to do the background quilting.  I blocked it two more times, once after quilting the background and again after the binding was on.
ready for background quilting 


Quilt blocked after background was quilted

I used Wonderfil Razzle thread to outline the design and Sulky Sliver Metallic for the rays in the background.

Here are some close-up of quilting:


The undersides of the leaves were painted with a mixture of Fabric Painting Medium and Jacquard Powdered Pigment in silver.

Tango - back
It measures 28” x 40”.

Creativ Festival - 2012

I entered this quilt in the Designer Style Challenge at the Creativ Festival being held in Toronto in October, 2012

Tango was a semi-finalist in the Quilt category. The Theme was “Celebration” with a touch of silver because it was the Creativ Festival's 25th SILVER anniversary. Otherwise the challenge was open ended to encourage creativity.

Tango is presently with Janome Canada Ltd., the sponsor for the Quilting category, for one year to display and promote the pieces and their respective designers.

Label on sleeve

Taken at Creativ Festival (Oct 2012)

DOCUMENTATION:
Quilt Name: Tango
Description: free motion quilting on bordered background
Pattern: original – stitched zentangle
Size: 28” x 40”
Fabrics: 100% hand dyed cotton, black commercial print
Predominant colours: orange, black
Construction Techniques: pieced inner border - free motion quilting
Back: Thai silk
Batting: wool
Edge finish: single fold binding
Quilting: Free motion quilted on Domestic Machine
Quilted by: Terry Whyte
Sleeve: yes
Label: on sleeve
Date completed: 2012
Quilt History: Semi finalist in Designer Challenge at Creativ Festival 2012
Maker: Terry Whyte

Friday, January 4, 2013

Travel Projects


 I'm leaving next week for a trip that I've dreamed about for a long time.

At this time next week I will have landed in Australia for a quilting cruise with Debbie Roberts Tours. It is a two week cruise along the coasts of Australia and New Zealand with one stop in Tasmania.

On the return, I will be spending a week in Vancouver with my son and family.

There might not be much blogging going on, but I will post some pictures if I can.

Since it will be a very long trip, I thought I would make a few projects to keep myself organized and comfortable.

Remember this!  This was my first attempt at Diane Gaudynski's feathers in Free Motion Quilting Challenge at SewCalGal.

Feather Sample

After cutting it down to size, I added some hyperlinking as per Patsy Thompson's tutorial in same challenge and  and stitched on some bias binding,.

hyperlinking
Stitched up the sides, added a big button from my mom's button box and a ribbon, and voila!  a little travel bag.

Travel Bag

With enough room for my new headset,  Blackberry Playbook and a couple of puzzle books.
with contents

I need a little pillow for my lower back when sitting for long period and saw a "Dog Bone Pillow" in a store but it was really firm and too big, so I decided to make my own out of a nice soft brown corduroy.  
It also make a great neck pillow.

Dog Bone Pillow with carrying handle and luggage tags

Before Christmas, I made a bunch of these leather luggage tags for stocking stuffers, and a few for myself.

close up - leather luggage tags

Almost ready to go, just need to finish packing.

Terry