Saturday, October 25, 2014

NOFA Meeting October 18, 2014

All seven members of the Northern Ontario Fibre Artists met for our fall meeting on Saturday, October 18th .

Northern Ontario Fibre Artists
As usual, we had a good showing of projects, for our Show and Tell and we discussed a little business.


Here are some of our work in progress and finished projects.  The postcards are from kits that were exchanged during our summer retreat:


After a yummy pot luck lunch, we viewed a slide show of the Burlington Fibre Content Show and then headed back up for a fun round robin workshop.

Marnie had participated in a similar project with Kathy Wylie and friends and she led us through the various steps. 

Just getting started
We all started with the same size base of fabric and batting supplied by Marnie. The idea was to add layers in a limited time frame. We had 30 minutes to make our background from cotton scraps.

We then picked names and everyone worked on someone else's piece.

Our time limit was now 20 minutes per round and we could choose from the different piles of either tulle/organza/sheers, ribbons/wools/lace or shiny/glitzy/textured fabrics.

As the piece progressed you could pick from the ones not already on the piece.

Here is how Marnie's piece progressed:

Marnie and her background

Jane added ribbons, lace and wool

Marie added textured leaves  

And Terry added more leaves from the organza, tulle pile
And this is how everyone else's piece looked at the start and finish.


 Very fun project.

 This is what mine looks like completed!

Terry's


Hope to see all the other finished pieces at our next meeting.


Happy Quilting

Terry

Tuesday, October 21, 2014

Poinsettia Post Cards


ART PROMPT - #14 – Use markers.

Poinsettia Post Cards

I tried playing with markers and alcohol on cotton but didn't care for what I was getting.

Then I thought maybe silk would be the way to go.

I drew a poinsettia on the silk and liked just the way it was without adding the alcohol. The ink spread just a little adding some interest.

I embossed the Christmas wishes,  embroidered french knots in the centres and did a little straight line quilting.

detail
Since I needed more post cards for a coming sale, I now have five more.

backs
Size 4” x 6”


See you next time,

Terry


NEXT ART PROMPT - #15 – Use Lutradur


HERE'S MY “ART PROMPT” PLAN

One prompt, one project (taking as long as required to finish the project)

It's OK to finish or use a previously started project (UFO) as a starting point.

Make something creative.

Use any Media.

Blog about the project.

Pick another prompt once the project is done.


Friday, October 17, 2014

Blooms


Quilt Documentation # 165

This was my entry into the Englehart Area Artists' - 6th Annual Juried Art Exhibition.
The show is on from October 11th to the 26th.

Blooms
It started as a sketch in my notebook.


The background was a piece of white cotton that I placed under another piece when hand dyeing by painting with liquid dyes (Procion H). This piece was to absorb the excess dye. I liked how the loosely woven cotton took the dye and decided to use it in this piece.

These are the two pieces side by side.


The flowers, leaves, and vase are organza that I stitched on and then burned around the edges using a soldering iron. The thread and background need to be natural fibre (cotton) to do this.

organza stitched
edges were burned to remove excess

Beads were added and stems were hand embroidered.

Close-ups of quilting:


I added strips of fabric around the edges to wrap and fasten to a wood frame.
edges

stapled to wood frame
back
signed and dated on bottom front


Linking up to The Needle and Thread Network and Nina-Marie's Off the Wall Friday.

Happy quiltilng,

Terry

DOCUMENTATION:
Quilt Name: Blooms
Description: Appliqued organza on hand dyed wholecloth background
Pattern: Original
Size: 20” x 40”
Fabrics: 100% cotton & organza
Predominant colours: Blue, green white
Construction Techniques: Organza appliqued and burned w/ soldering iron
Back: 100% cotton
Batting: one layer of cotton and one layer of mystery batting
Edge finish: Strips added around the edges and wrapped around wood frame
Quilting: Free motion quilted on Domestic Machine
Quilted by: Terry Whyte
Sleeve: no
Label: signed on front
Date completed: October 2014
Inspiration: own sketch
Quilt History: Juried into 6th annual Englehart Area Artists show, 2014
Maker: Terry Whyte


Friday, October 3, 2014

Birch Bark Postcard


ART PROMPT - #13 – Add something from nature.

I did not have to think hard, for what to make, as I have been thinking of doing this since I started making fibre postcards.

Paper Bark Postcard
 I placed the birch bark under a pile of books to help flatten it.

The design was burned in using a soldering iron. I wonder what else could be used??? Wheels are turning!

The stitching was done from the back with Wonderfil Razzle thread in the bobbin.
The straight line of stitching went through the bark and Timtex only.
I used a wide zigzag around the edge so it wouldn't split the bark.

I found the "Postcard" stamp at The Paper Place in Toronto

I'm now on the lookout for just the right pieces of bark.

Fun project.

Size 4” x 6”


See you next time,

Terry


NEXT ART PROMPT - #14 – Use markers.

.
HERE'S MY “ART PROMPT” PLAN

One prompt, one project (taking as long as required to finish the project)

It's OK to finish or use a previously started project (UFO) as a starting point.

Make something creative.

Use any Media.

Blog about the project.

Pick another prompt once the project is done.


Tuesday, September 30, 2014

Fibre Content Show and Open Door Studio Tour

It has been a busy few weeks.

FIBRE CONTENT - ART GALLERY of BURLINGTON

Shortly after our week-end retreat, I headed south to Burlington for the Fibre Content Show.

The show was wonderful with so much eye candy, I spent a whole afternoon there and still wished I could have gone back for another day to really take it all in.  I met several fibre artists on this trip and everyone involved with this show was so nice and welcoming.  Thank you everyone!

Seven Create


Our group entry "Seven Create" by Northern Ontario Fibre Artists was well received, lots and lots of great comments.

A nice surprise was that it came in third place as viewer's choice.

OPEN DOOR STUDIO TOUR

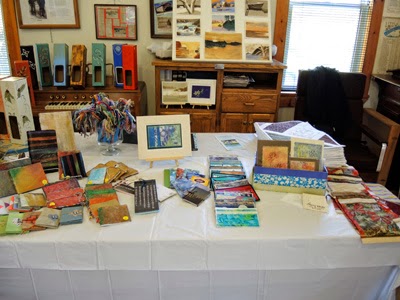
This past week was the Open Door Studio Tour held by the Englehart Area Artists.  This was my first year to participate.  Since I live a little ways away from the tour area, I set up at the Heritage Centre in Charlton along with 4 other artists.

Here's a couple of shots of my area:


Mini-books, post-cards, greeting cards and watercolours.

Gift bags, mini quilts and infinity scarves.

Mother Nature co-operated with the added bonus of gorgeous fall colour.


A decorated door marked each studio location.


I'm now hoping that things will settle down for a bit.

Happy quilting,

Terry 

Friday, September 12, 2014

NOFA – Week-end Retreat 2014


This year, the Northern Ontario Fibre Artists met for a week-end retreat at Marie's cottage. This our third annual fun week-end.

Kit, Silvia, Marnie, Terry, Marie, Karen.
Jane was unable to attend this year.

As usual, we experimented with several techniques, ate great food and had lots of laughs.

Here's a few pictures from the week-end.

The Stained & Scorched article by Victoria Gertenbach in a recent Quilting Arts magazine was the inspiration for these pieces.  The cotton was "painted" with lemon juice and ironed with hot iron. Red wine works as well and gives a pinkish tinge.   This was really fun to play with and see what would happen.

Lemon juice and red wine stained and scorched

A closer look
We also experimented with stencils.

Terry and Silvia taking a break from stencilling
Next the paints came out and we mono printed, scraped, and stamped on fabric as well as water colour papers.

Scraping paint around with credit card and stamping with hand carved stamp on paper

These are greeting cards I made from some of mono printed paper

And of course, we had to have a pj picture.


Yummy dessert, a glass of wine and good company.  It does not get any better!


Happy Quilting,

Terry 

Saturday, September 6, 2014

Broken Herringbone Placemats

From Quilt Top to Placemats

Quilt Documentation # 164
Broken Herringbone Placemat

This all started last winter when the quilt in this picture on someone's blog, of the Violet Craft booth at a show, caught my eye.


Violet Craft booth

I must have been in a sewing/piecing mood and thought that these 5” wide quilt strips that I had won a few years back would make a wonderful King size quilt.

5" "jelly roll"

This was my process:

sewing panels together


Assembling panels in long strip

I made four of these


These fabrics and colours are not me and I just could not go any further with the quilt idea.

Then I remembered I had previously cut up a quilt for placemats before, see here.

The strips were perfect to cut into placemats.  This is what they look like:

As cut from strip

Four more


back - plain white - 13" x 18"

I will be taking part in a Studio Tour at the end of the month so hopefully someone might be interested.

14 completed placemats (could make as many again)

Colour and fabric choices make such a difference. I just had a look at Violet's blog and found this quilt she made using the same pattern. I love her "Modern colour choices".


Happy Quilting

Terry