Sunday, February 1, 2015

Medallion for Mackie and Jesse


Back Home!

After spending almost 3 weeks in California and Arizona, it's back to the deep freeze and lots of snow. 
Oh well, more time for quilting and playing with artsy stuff!

Quilt Documentation #183

Medallion for Mackie and Jesse

Quilts for Christmas

My personal quilting challenge for 2014 was to make a quilt for each one of my six grandchildren.

“Medallion” was made for my grandson Mackie and Jesse, who recently moved into their new home. I found out that the decorating was heading towards a neutral palette with touches of copper.

I made this Medallion top a few years ago when teaching classes from my own original design.

The colour scheme was just right, so I took it to Marnie, for long arm quilting.  The back is extra wide flannel, the binding is a solid black cotton.


Here's a few close-up shots:

 Medallion - centre

Medallion - corners 

Medallion - outer borders

All I needed to do was square it up, add the binding and a label.

Medallion - back label and binding

This quilt measure 76” x 92”

Jesse and Mackie with Medallion - Christmas 2015

I have made a total of four of these medallion. You can see the others:
here (Country Stars), 
here (Elephant Walk)
and here (Jewel Tone Medallion).

Linking to Nina-Marie's Off the Wall Friday.

Happy Quilting,

Terry


Thursday, January 8, 2015

Red Stars at Night


Quilt Documentation #182

Red Stars at Night

Quilts for Christmas

My personal quilting challenge for 2014 was to make a quilt for each one of my six grandchildren.

Red Stars at Night was made for Matthew, a 25 year old bachelor who owns his own home. His living room colour scheme is black and white with red accents.

Judy Laquidara's February Scrappy Challenge Block was perfect for this quilt.

I placed the blocks on point and filled in with plain black on point squares.  The four-patches were all made with brown or black prints and white-on-white, white beige or grey prints 


Here's a close-up of one of the blocks:

Red Stars at Night - block

I used flannel with a snowflake design on the back.
Red Stars at Night - back

plain grid quilting in-the-ditch

label and binding

By the way, he's my oldest grandson and the one who gave me my "grandma" name.  When he started talking he called me Samma and it has stuck to this day with all the grandkids.

Matt with Red Stars at Night.


Linking to The Needle & Thread Network.

Happy Quilting,

Terry 


DOCUMENTATION:
Quilt Name: Red Stars at Night
Description: 12 pieced star blocks set on point with plain black squares
Pattern: Judy Laquidara's February Scrappy Challenge 
Block Size: 60" x 76"
Fabrics: 100% cotton
Predominant colours: Black, neutrals, white
Construction Techniques: pieced
Back: flannel
Batting: Warm and Natural 80/20
Edge finish: Double fold french binding
Quilting: Free motion quilted on Domestic Machine, diagonal grid in- the-ditch
Quilted by: Terry Whyte
Sleeve: no
Label: yes
Date completed:  2014
Inspiration: Judy Laquidara's Challenge Quilt 
History: Display at the Kirkland Lake Mile of Gold 2014 Quilters' Guild Show, at Museum of Northern History
Maker: Terry Whyte

Wednesday, December 24, 2014

Quilts for Christmas!


Here's a peek at five of the six quilts I made this year for my grandchildren.

Quilts for grandkids
The sixth one was being long arm quilted at the time of the photo.
I quilted all the others on my domestic machine.

I will document all of these in the new year.

Wishing you and yours a very Merry Christmas!

Terry

Linking to The Needle and Thread Network.

Friday, December 19, 2014

Flying Santa


Quilt Documentation #181


Flying Santa

I bought this little panel several years ago. I thought it would be fun to make as my husband is a pilot.

Hand printed panel

Last year, I added the border and sandwiched the layers and never got any further.

So this year, I quilted it and added a fused binding and a couple of little tabs to hang it from.

binding

It measures 12” x 15”.

Merry Christmas to all!

Terry

Sunday, December 14, 2014

ART PROMPT - #17 – Find something unusual to add texture


Coat of Arms
Coat of Arms
This is not so unusual but is a new process for me. I have added texture to fabric before using hand stitching but this time I wanted to see what I could do with only a running stitch to highlight a design.

During our NOFA fall retreat, we played around with staining and scorching fabric, see here, so I'm using this little 8" x 8" piece to play with.

After a little experimenting with different threads and even fine wool, I chose a metallic thread to co-ordinate with the scorched areas on my sample.

in progress


I tried stitching on the cotton only and did not care for the look I was getting.

In the end, I added batting and a back and basically hand quilted the piece.

I really like the texture I got from crisscrossing the stitches.

detail

Here it is blocked and sprayed with lots of water.

blocking

And a close-up of the criss-crossing.

criss-cross detail

I'm not sure how successful this is and also not sure what to do with it.

Placing it in an 8” x 8” frame doesn't do much.

Add caption

Win some, lose some!

I'm leaving the edges unfinished for now, it may get added to another project in due time.


See you next time,

Terry


NEXT PROMPT -  #18 – Use stencils


HERE'S MY “ART PROMPT” PLAN

One prompt, one project (taking as long as required to finish the project)

It's OK to finish or use a previously started project (UFO) as a starting point.

Make something creative.

Use any Media.

Blog about the project.

Pick another prompt once the project is done.


Wednesday, December 3, 2014

ART PROMPT - #16 – Cover up something - Part 2


Quilt Documentation # 180

Can't See the Forest for the Trees

Can't See the Forest for the Trees


When I left that post this is where I was at:

Grid covered background

I thought that this could look like a sunset through the trees?????? maybe???

So I decided to add more trees, this time using "felt" that I could cut and/or burn into the shapes I wanted.

trunks pinned in place

I first stitched the trunks in place and then thread painted all the branches.

I cut a paper pattern for placements of the bushy branches and then used the pattern pieces for cutting/burning the black felt.

branches

burning edges using patterns as a guide

As it is very much winter here, I needed to set up where I had a fan, for me, that meant on the kitchen stove. Here's my set-up: A ceramic floor tile on top of a raised cutting board (for height), soldering iron, steel wool for cleaning the point, I also use it to set the iron on, a metal chop stick, and a mask. Wear the mask and turn the fan on!

setup under stove fan

It turned out I had two different kinds of black felt and they burned quite differently.
The one on the left got very shiny and glossy when burned, so probably more polyester content.  Hard to see on photo.

Different felts - different looks

I free motion zig zag stitched over the burned branches to attach them to the background.
I added a sleeve, a plain black binding and a label.

label

Even though I like the looks of the burned felt, I don't especially like the texture, it is rough to touch, not smooth at all.

So, this is what I started with:

What needed to be covered up

And this is what I finished with:

Can't See the Forest for the Trees

Can't See the Forest for the Trees - back


See you next time,

Terry


NEXT PROMPT -

ART PROMPT - #17 – Find something unusual to add texture


HERE'S MY “ART PROMPT” PLAN

One prompt, one project (taking as long as required to finish the project)

It's OK to finish or use a previously started project (UFO) as a starting point.

Make something creative.

Use any Media.

Blog about the project.

Pick another prompt once the project is done.

Thursday, November 27, 2014

Working in a Series – Birds – Part 6


Working in a Series – Birds – Part 6


Quilt Documentation 178 – 179

These small quilts are exercises from Art Quilt Workbook by Jane Davila & Elin Waterston.  
All measure 9" x 12".
(see first post here)

Found Objects

Objects that are not too heavy or too fragile, that are mostly two-dimensional and that are not too big work best in art quilts.
Paper, natural objects, man-made objects can be attached by hand or machine, glued, wired or fused.

Quilt Documentation 178

"Birds - 10"

The found objects in this quilt include:
scrapbooking paper, brown paper stamped with my crow stamp, painted newspaper, map, a small collage of melted plastic shopping bags on textured background, a pair of old earings (backs removed and attached with embroidery thread) and couched wool.

I also couched the same wool around the edges for a binding.


"Birds 10 - Found Objects

"Birds 10 - Found Objects - back


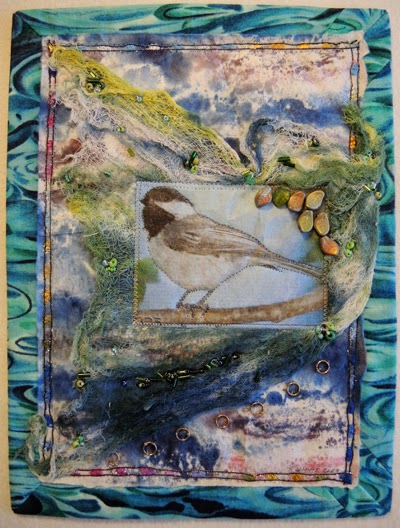
Embellishments

There is no end to what can be used for embellishing, beads, buttons, shisha mirrors, sequins, trims, and charms, just to name a few.


Quilt Documentation 179

"Birds -11"

For this quilt, I placed my batting onto the fabric I wanted to use for the back and wrapped the edges around the batting on the front. I stitched a piece of stabilizer that had been painted or dyed. A piece of trim added a skinny border just inside the raw edges. The dyed cheesecloth was hand stitched and then appliqued with a chickadee printed on cotton. Beads and little rings from an old necklace finished it off.

"Birds 11 - Embellishments

"Birds 11 - Embellishments - back


Art Quilt Workbook by Jane Davila & Elin Waterston is full of ideas and suggestions, and gives you enough instructions on how to use certain products or techniques to get you going.

I really enjoyed the process of making this series of little quilts and learned a lot.

Learn and have fun by doing, it doesn't have to turn out perfect every time.

Just go for it!

Happy Quilting,

Terry