Tuesday, November 25, 2014

Working in a Series – Birds – Part 5


Quilt Documentation 175 – 176 - 177


These small quilts are exercises from Art Quilt Workbook by Jane Davila & Elin Waterston.  
All measure 9" x 12".
(see first post here)

Thread Work

Thread painting, bobbin drawing, couching and free-motion quilting are all means of visual expression that use thread as a medium.

Thread Painting

Quilt Documentation 175

"Birds - 7"

Blue Jay was thread painted on a separate fabric, cut out and then appliqued over my quilted background.
The yellow-green square behind the bird was printed with circles. I free-motioned zig-zagged around the circles.
Some beading on little blue squares add more interest.


"Birds 7 - Thread Painting

"Birds 7 - Thread Painting - back

Bobbin Drawing

Quilt Documentation 176

"Birds - 8"
This bird was thread painted directly on the fabric before sandwiching the layers to do the bobbin drawing of the cage.
The sparkly heavier thread was placed in the bobbin and stitched from the back.
I added a facing and followed the outline of the cage, just for fun.

"Birds 8 - Bobbin Drawing 

"Birds 8 - Bobbin Drawing - back

Free-Motion Quilting

Quilt Documentation 177

"Birds – 9"

Toucan is a simple applique with busy free motion quilting in the background.
I think it balances out.

"Birds 9" - Free motion quilting
"Birds 9" - Free motion quilting - back
More to come.

Link to The Needle and Thread Network.

Happy Quilting,

Terry

Monday, November 24, 2014

Working in a Series – Birds – Part 4


Quilt Documentation 173 - 174


These small quilts are exercises from Art Quilt Workbook by Jane Davila & Elin Waterston.  
All measure 9" x 12".
(see first post here)

Stamping

Stamps can be:
ready-made - purchased
original - hand made from many different materials
found - from natural objects or all kinds of tools or items just laying in and out of your house.

Quilt Documentation 173

"Birds - 5"

The background is made up of curved and straight piecing.
I cut a little crow stamp from fun foam and changed the orientation a little so even though it is the same stamp, they look a little different. I like how the gold from the fabric came through the ink.
The leaves are from a block stamp that I kept turning in different directions to avoid the “blocky” look. I also stitched over some of the leaves and added a few extra of my own.
Machine quilting and some french knots completed this quilt.


Birds 5 - Stamping

Birds 5 - Stamping - back

Foiling

Metallic foils can be transferred to fabric using liquid glue, fusible web, or bonding powder.

Quilt Documentation 174

"Birds - 6"

I appliqued a couple of rectangles to the background using a machine buttonhole stitch.
I then cut out bird shapes from fusible web and fused them to the pieced background and applied the foil.
There's a feather (from my duster ;) behind some tulle in the corner.
I added a little quilting, some buttons and beads to finish the piece.
The binding is from a piece of variegated organza wrapped around the edges.

Birds 6 - Foiling

Birds 6 - Foiling - back
More to come.

Happy Quilting,

Terry


Sunday, November 23, 2014

Working in a Series – Birds – Part 3

Quilt Documentation 171 - 172


These small quilts are exercises from Art Quilt Workbook by Jane Davila & Elin Waterston.
All measure 9" x 12".
(see first post here)


Innovative Piecing

Several ideas were covered, machine-pieced freehand curves, wonky piecing, insert strips.

Quilt Documentation 171

"Birds - 3"

I chose to make Wonky Log Cabin Blocks using my own photos, printed on fabric of a crane walking along the beachfront, as the centre of the block.


"Birds - 3"  Wonky Log Cabin Blocks

"Birds - 3"  Wonky Log Cabin Blocks - back
Paint Effects

Exercises included either abstract or representational painting.

Quilt Documentation 172

"Birds - 4"

On this quilt, the birds as well as the branches are painted on batik. The tree trunk is a black cotton applique which also had light paint added on the right side. Stitching with black and grey threads added more shading.
The background was quilted with a grey and black variegated rayon thread.
I wish I could remember what I used for the painting, maybe ink as it has a very soft hand.
"Birds - 4"  Paint Effects


"Birds - 4"  Paint Effects - back
More to come.

Happy Quilting,

Terry

Working in a Series – Birds – Part 2

Quilt Documentation 169 - 170


(see previous post here)

Collage with a Focus

These collages contain a central image, other elements emphasize or accentuate the image to create an interesting visual arrangement.

Quilt Documentation 169

"Birds - 1"

This collage uses a printed fabric image, the swirling turquoise fabric representing water.

"Birds - 1" Collage with a Focus
"Birds - 1" Collage with a Focus - back

Quilt Documentation 170

"Birds - 2"

For the second collage, I printed one of my own photos of a goose on a post onto fabric.
I added another “sign post” on the left of the picture and some mother of pearl pieces which have a “watery” look.

I experimented with a fused binding that I cut with a wavy rotary blade and then programmed a leaf stitch on my machine to add to the edges.

"Birds - 2" Collage with a Focus
"Birds - 2" Collage with a Focus -back

More tomorrow.

Happy Quilting,

Terry

Working in a Series - Birds

Quilt Documentation 166 - 167 - 168


After a week of sun and fun in Punta Cana to celebrate our 50th Wedding Anniversary and a few days in Toronto (rain and snow – not so fun), I'm ready to get back in my sewing room and sew, sew, sew!

I'm working on Part 2 of my Art Prompt #16 project “Covering up Something” and liking what is happening so far.

In the meantime, I'll post my “Bird Series” from 2008 and 2009 .

I purchased Art Quilt Workbook by Jane Davila & Elin Waterston back in 2008 and worked through the book – first doing several exercises on paper and then making three practice quilts before starting work on the Bird Series.


My chosen theme was “Birds”.

All quilts are 9” x 12”.


It is suggested to use a Controlled Palette throughout the series, using these fabrics and fabrics that go with these, plus an occasional deviant colour. The quilts in the series will play well together and the series will be more cohesive.

This is my Controlled Palette:

Controlled Palette

And these are the three exercises from the book.

Quilt Documentation 166

Working from a Pattern – Pear Quilt - front and back

Pear Quilt - front 


Pear Quilt - back

Quilt Documentation 167

Working from an Original Drawing of a photo – Sammy - front and back

Sammy - front 
Sammy -  back
Quilt Documentation  168

Colour Collage – Three Organic Shapes (not too representational) arranged on a Background - front and back

Colour Collage – front
Colour Collage – back


See you tomorrow with a Bird Quilt.

Link to Nina-Marie's Off the Wall Friday.

Happy Quilting,

Terry

Friday, November 7, 2014

ART PROMPT - #16 – Cover up something - Part 1


Work in Progress

Since I needed something to cover up, I dug around my UFO pile and found this project.

UFO

some of the pieces were appliqued, some not

It was started in response to our quilting guild's 2007 President's Challenge which entailed picking three colouring crayons from a bag. The three colours chosen had to be used in a small quilt and one more colour could be added.

My colours were brown, green and orange – totally NOT my colours, I added yellow (gold) as my fourth colour.

This is as far as I got before deciding that this was pretty ugly and I didn't know where to go with it.

Instead I made “Birdhouse”. I blogged about it here.

Birdhouse


When I put it away I stuck the left-over fabric in the bag along with the project.

fabric from original project
I fused some Heat n Bond to the back of the gold and green and cut into 1/2” strips.

My idea of fusing a grid over the whole thing seemed like an easy execution. Keeping everything straight and weaving over and under in the right places proved different. I had to take out several rows. I gently heated the strips with my iron and was able to pull them up and fuse them back down. I don't know if this would work with any fusible web but it work fine with this one.

keeping it straight
over and under

I added some batting and a back and quilted along both edges of the strips.

quilted

WAIT! I'M NOT DONE. I have an idea for more covering up. I hope it works!

Linking to Nina-Marie's Off the Wall Friday

See you next time,

Terry


WORK IN PROGRESS -

ART PROMPT - #16 – cover up something


HERE'S MY “ART PROMPT” PLAN

One prompt, one project (taking as long as required to finish the project)

It's OK to finish or use a previously started project (UFO) as a starting point.

Make something creative.

Use any Media.

Blog about the project.

Pick another prompt once the project is done.


Friday, October 31, 2014

Lutradur Poppy and Poinsettia


ART PROMPT - #15 – Use Lutradur

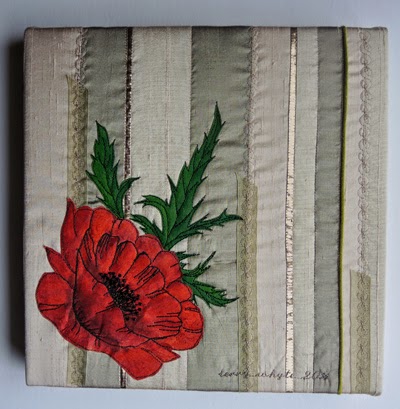
Lutradur Poppy and Poinsettia

The Englehart Area Artists hold a yearly Christmas Tyme Sale to coincide with The Unveiling of Christmas.   Area artists and crafters bring in their goods and the sale articles are placed “boutique style” throughout the hall.

Club members are also asked to participate by making one or two 12” x 12” canvases to sell at this event.

This year's theme was red, green and a touch of gold.

The Lutradur prompt came along at just the right time for this project.

I started by drawing on the Lutradur and adding layers of acrylic paint starting with a layer of white and adding 1 or 2 layers of colour.

drawing on lutradur


white layer of acrylic paint

second layer

third layer


For my background, I cut three different beige silk fabrics into random width strips to stitch together. I added a couple of skinny strips of shiny gold fabric (not lame, but similar) and a strip of light green piping to each panel.


stitched panel

detail

I added a layer of thin wool batting and quilted in the ditch.

I then placed 3 lenghts of green sheer ribbon on seams and used a decorative machine stitch over the seam and ribbon.

After cutting out and appliqueing the lutradur flowers and leaves, I changed my mind and decided I liked the looks of the ones I had outlined in black best, so I went back and did them all the same.
leaves before black outline stitch 

black stitching in progress


I also thought I needed to add some dark values so the paint came back out. The nice part of using lutradur is that acrylic paint barely seep through it, so it can still be painted after it is attached to the fabric.
darker values added
 And here are the finished pieces, wrapped and stapled to 12” x 12” canvases:


Lutradur Poinsettia

Lutradur Poppy
See you next time,

Terry


NEXT ART PROMPT - #16 – cover up something


HERE'S MY “ART PROMPT” PLAN

One prompt, one project (taking as long as required to finish the project)

It's OK to finish or use a previously started project (UFO) as a starting point.

Make something creative.

Use any Media.

Blog about the project.

Pick another prompt once the project is done.